
Introduction
This guide details how to reset absolute zero for each axis for all VMCsi models.
-
-
Before an axis can be referenced, the control must be told the encoder’s current state. This is tracked using MD34210, which determines whether the encoder is unreferenced, ready to calibrate, or already calibrated.
-
34210 set as 0: Encoder Not Calibrated. The encoder has no reference to the physical position. Use this to clear or reset the reference.
-
34210 set as 1: Calibration Enabled. Encoder is ready to establish a new reference. This is the manual setup state.
-
34210 set as 2: Encoder Calibrated. The encoder position is successfully established, and the machine recognizes the axis position.
-
-
-
If the machine has a trunnion installed and the X, Y, or Z axis is re-referenced, the entire trunnion calibration must be redone.
-
-
-
-
If changing out a ballscrew or motor, set the position to zero to avoid software limit switch alarms.
-
Press [JOG] on the MCP.
-
On the touchscreen, press the [Machine] shortcut key in the top left corner of the screen.
-
Next, press the Vertical Soft Key (VSK) labeled [Act. values Machine].
-
Make sure that VSK [Act. values Machine] remains highlighted on the screen during the next step.
-
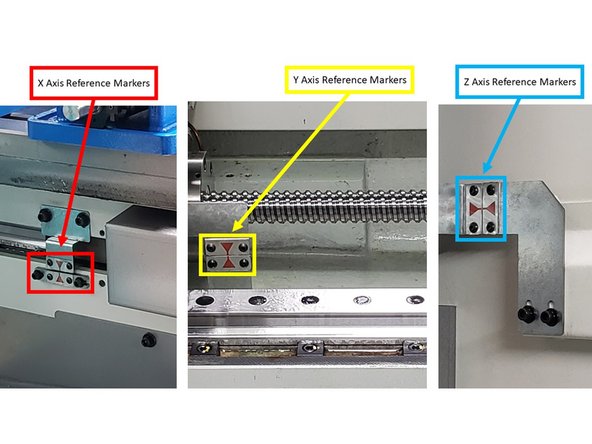
Jog the table, saddle, and head to the 0 reference position, as shown on the image.
-
-
-
Manufacturer access level is required in order to change machine settings. Enter the manufacturer login credentials via the following steps:
-
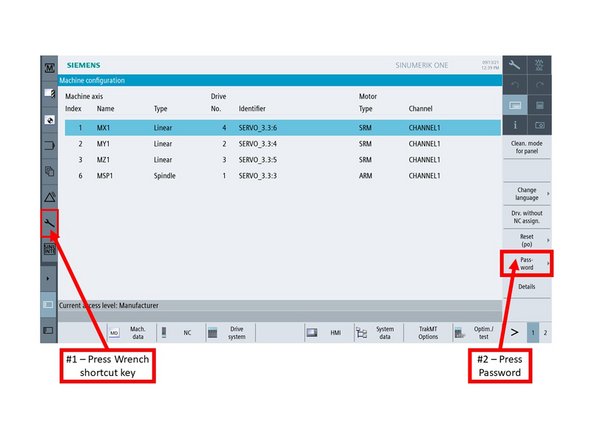
On the touchscreen, press the [Wrench] shortcut key on the left side of the screen.
-
The [Setup] window appears. Press VSK [Password] on the right side of the screen.
-
On the next screen, press VSK [Set password].
-
Enter the appropriate password when prompted, and then press [OK].
-
-
-
Go to [Setup]→ [Mach. data] → [Axis MD] → [Select Axis] →[AX1:MX1]
-
[Search] for 34210.
-
On the Axis MD window, confirm that you are under AX1:MX1 .
-
Turn on the [JOG], [REF. POINT], and [X] buttons on the MCP.
-
Set MD34210[0] = 1
-
Parameter 34210 set to 1 means the encoder is ready to establish a new reference, indicating the manual setup state.
-
Press the "[-]" button on the MCP. The value for Parameter 34210[0] should change from "1" to "2" automatically.
-
The changing of the value to "2" means that the referencing process is complete for that particular axis.
-
-
-
Go to [Setup]→ [Mach. data] → [Axis MD] → [Select Axis] →[AX2:MY1]
-
[Search] for 34210.
-
On the Axis MD window, confirm that you are under AX2:MY1.
-
Turn on the [JOG], [REF. POINT], and [Y] buttons on the MCP.
-
Change Parameter 34210 to "1"
-
Parameter 34210 set to 1 means the encoder is ready to establish a new reference, indicating the manual setup state.
-
Press the "[+]" button on the MCP. The value for Parameter 34210[0] should change from "1" to "2" automatically.
-
The changing of the value to "2" means that the referencing process is complete for that particular axis.
-
-
-
Go to [Setup]→ [Mach. data] → [Axis MD] → [Select Axis] →[AX3:MZ1]
-
[Search] for 34210.
-
On the Axis MD window, confirm that you are under AX3:MZ1 .
-
Turn on the [JOG], [REF. POINT], and [Z] buttons on the MCP.
-
Change Parameter 34210 to "1"
-
Parameter 34210 set to 1 means the encoder is ready to establish a new reference, indicating the manual setup state.
-
Press the "[+]" button on the MCP. The value for Parameter 34210[0] should change from "1" to "2" automatically.
-
The changing of the value to "2" means that the referencing process is complete for that particular axis.
-
-
-
Go to [Setup]→ [Mach. data] → [Axis MD] → [Select Axis] →[AX4:MA1]
-
[Search] for 34210.
-
On the Axis MD window, confirm that you are under AX4:MA1.
-
Turn on the [JOG], [REF. POINT], and [4] buttons on the MCP.
-
Change Parameter 34210 to "1"
-
Parameter 34210 set to 1 means the encoder is ready to establish a new reference, indicating the manual setup state.
-
Press the "[+]" button on the MCP. The value for Parameter 34210[0] should change from "1" to "2" automatically.
-
The changing of the value to "2" means that the referencing process is complete for that particular axis.
-
-
-
Make sure that the [REF. POINT] button on the MCP remains ON for the next step.
-
On the touchscreen, press the Machine shortcut key on the top left corner of the screen.
-
As shown on the image, confirm that all values under the Measuring Result Display (MRD) column are "0."
-


![Press [JOG] on the MCP.](https://d3t0tbmlie281e.cloudfront.net/igi/trakmtsupport/ASnQXAg2awO4NT3j.medium)
![On the touchscreen, press the [Machine] shortcut key in the top left corner of the screen.](https://d3t0tbmlie281e.cloudfront.net/igi/trakmtsupport/ygXssFrAJkHiuub6.medium)
![On the touchscreen, press the [Wrench] shortcut key on the left side of the screen.](https://d3t0tbmlie281e.cloudfront.net/igi/trakmtsupport/uCWXFhDXHKoAEL1c.medium)
![The [Setup] window appears. Press VSK [Password] on the right side of the screen.](https://d3t0tbmlie281e.cloudfront.net/igi/trakmtsupport/sl4IEPmLW3Gm3ya1.medium)
![Go to [Setup]→ [Mach. data] → [Axis MD] → [Select Axis] →[AX1:MX1]](https://d3t0tbmlie281e.cloudfront.net/igi/trakmtsupport/MDKAyIarVBD6Ahr2.medium)
![[Search] for 34210.](https://d3t0tbmlie281e.cloudfront.net/igi/trakmtsupport/RYcwn2jTL2dULSYP.medium)
![Go to [Setup]→ [Mach. data] → [Axis MD] → [Select Axis] →[AX2:MY1]](https://d3t0tbmlie281e.cloudfront.net/igi/trakmtsupport/bmGXFDeTkj4jamtp.medium)
![[Search] for 34210.](https://d3t0tbmlie281e.cloudfront.net/igi/trakmtsupport/Cbas2PLI4lsDynjL.medium)
![Go to [Setup]→ [Mach. data] → [Axis MD] → [Select Axis] →[AX3:MZ1]](https://d3t0tbmlie281e.cloudfront.net/igi/trakmtsupport/PfFJglnsKYXlu3yU.medium)
![[Search] for 34210.](https://d3t0tbmlie281e.cloudfront.net/igi/trakmtsupport/SSZI31xocRSKLuwR.medium)
![Go to [Setup]→ [Mach. data] → [Axis MD] → [Select Axis] →[AX4:MA1]](https://d3t0tbmlie281e.cloudfront.net/igi/trakmtsupport/Y211AJRLSbK2W6xu.medium)
![[Search] for 34210.](https://d3t0tbmlie281e.cloudfront.net/igi/trakmtsupport/3cXsAJRLhBK2W6xu.medium)
![Make sure that the [REF. POINT] button on the MCP remains ON for the next step.](https://d3t0tbmlie281e.cloudfront.net/igi/trakmtsupport/peYQ6lH5au34VtUs.medium)
Cancel: I did not complete this guide.
One other person completed this guide.