Introduction
This guide upgrades a TC820si to the current PLC user program and machine configuration using the Expert Deployment (Create My Config Expert) file. Use it only on a TC820si; every other TCsi model has its own guide, listed in Step 1. Old-PLC machines (01.XX.XX) need extra steps, which are marked in the guide. Read the current version of this guide before every upgrade, because Engineering may add steps with each release.
-
-
Check the model on the machine nameplate and confirm you are in the guide for that model. Each TCsi lathe has its own Expert Deployment guide:
-
-
-
-
-
-
Using the wrong guide selects the wrong machine configuration.
-
-
-
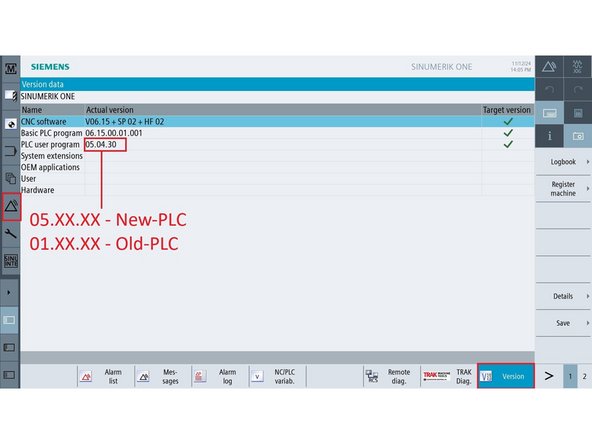
Go to [Diagnostics] → [Version]
-
If PLC user program version is 01.XX.XX, the machine has Old-PLC. Continue to Step 3.
-
If PLC user program version is 05.XX.XX, the machine has New-PLC. Skip to Step 6.
-
Write the PLC version down. It decides the deployment option in Step 13.
-
-
-
Steps 3 to 5 are required only if Step 2 showed Old-PLC (01.XX.XX).
-
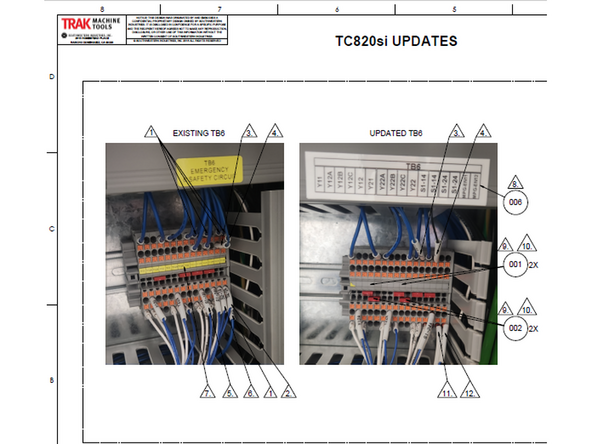
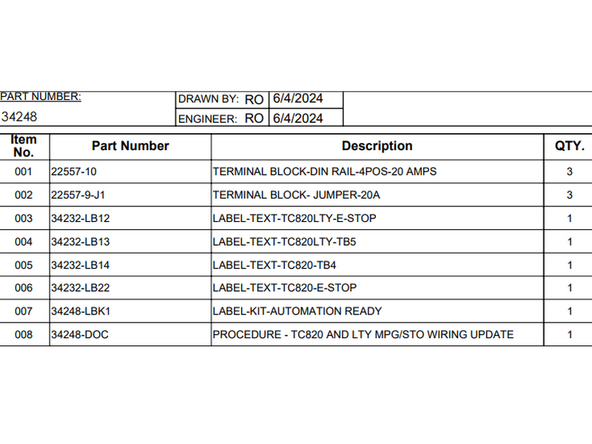
All TC820si machines upgrading from Old PLC (01.xx.xx) to New PLC (05.xx.xx) require a wiring modification prior to software upgrade.
-
This update ensures that opening the machine door no longer disables axis motion.
-
Refer to Wiring Kit Document 34248 for required changes, including terminal block updates (TB6) and wire relocations.
-
M-codes change with the New PLC.
-
-
-
-
Step 4 is required only if TC820si has Old-PLC i.e. PLC user program version 01.xx.xx.
-
-
Go to [Setup] → [Mach. Data] → [General MD].
-
Press [Search] and enter 11230
-
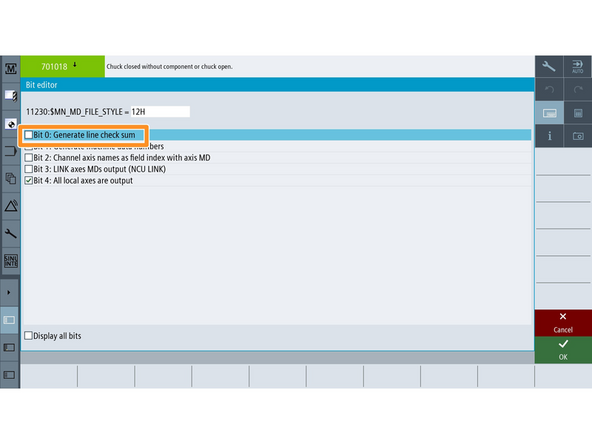
Select the 11230 variable and ensure Bit 0 is deselected.
-
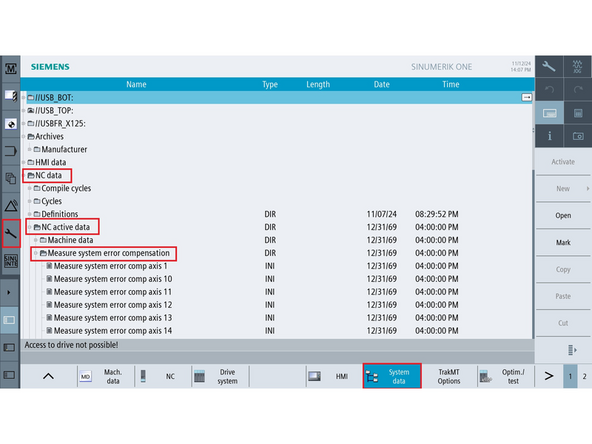
Go to [Setup] → [System Data] → [NC data] → [NC active data] → [Measure system error compensation].
-
Click on Measure system error comp axis 2 then press [Copy].
-
At the top of the directory, find your USB location and press [Paste]. The file on the USB stick will appear as AX2_EEC.ini.
-
-
-
Step 5 is required only if TC820si has Old-PLC i.e. PLC user program version 01.xx.xx.
-
Use a computer to open the AX2_EEC.ini file.
-
Rename AX2_EEC.ini to AX3_EEC.ini.
-
This adjustment is necessary because the Z-Axis is moving from Axis 2 to Axis 3.
-
Open the file in Notepad.
-
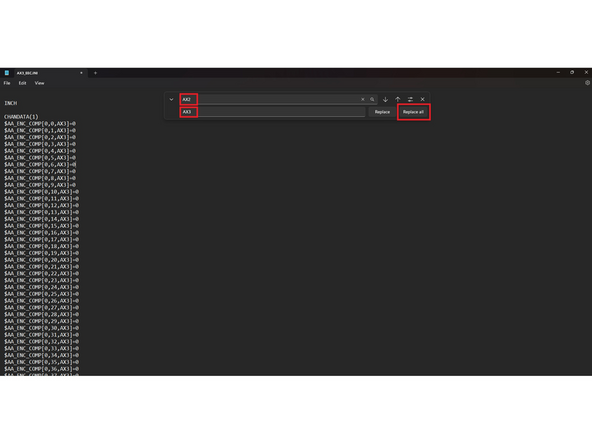
Press Ctrl + H to open the "Replace" function.
-
In "Find," type AX2; in "Replace with," type AX3. Click Replace All to update all instances of "AX2" to "AX3" in the file.
-
Save the file. It will be used in Step 17.
-
-
-
Start with a clean USB drive.
-
Starting with deployment file 02.00.14, the .usz file is about 3 GB (previously about 1.5 GB).
-
There should be no files on the USB stick other than the deployment .usz file. The upgrade may fail if the deployment file is not copied to a blank USB stick.
-
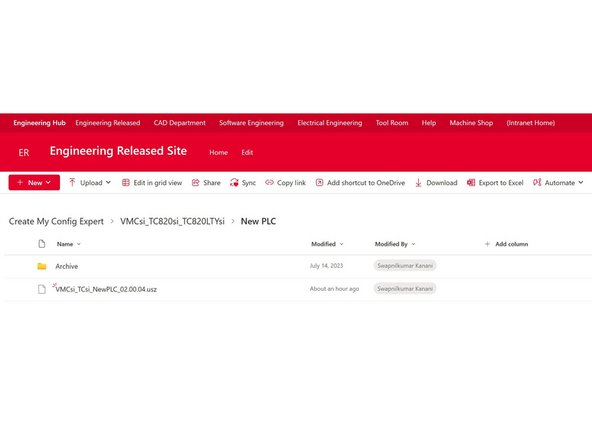
Locate the master deployment file on SharePoint:
-
-
Engineering releases new deployment files (.usz) to fix bugs and add features, so the version on the link may differ from the one in the picture.
-
Copy the .usz file to the USB drive.
-
-
-
-
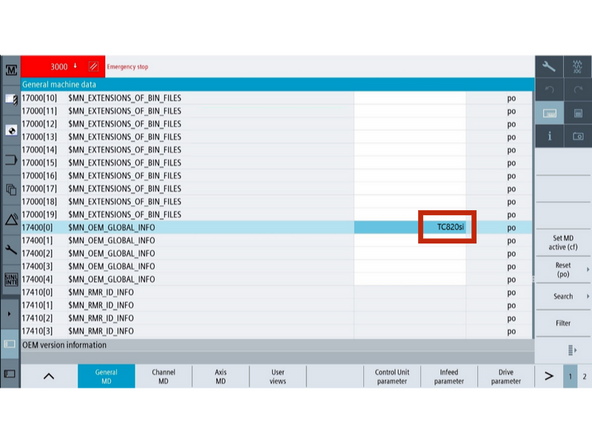
Go to [Setup] → [Mach. Data] → [General MD] → [Search].
-
Enter 17400 and press [Input]. Set 17400[0] to TC820si, entered exactly as shown.
-
If you changed it, press [Reset (po)] on the right hand side to apply the change.
-
17400[0] must contain the machine model only. Do not add serial numbers or other information. If it is wrong, custom screens such as the M-code side screen and the diagnostic screen may not work.
-
Earlier versions of this procedure did not follow this rule, so 17400[0] may hold a serial number or other text. If it does, correct it to the model name only.
-
-
-
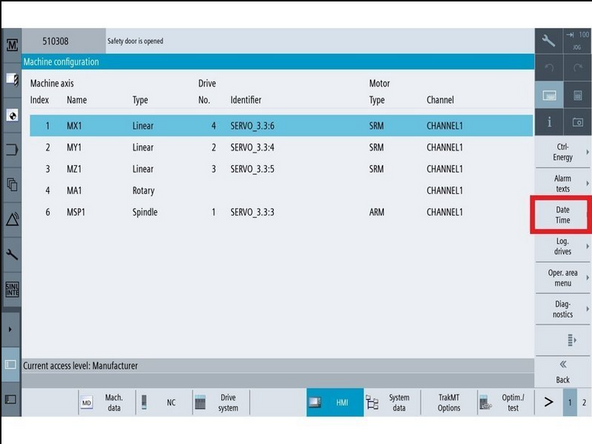
If [Reset (po)] was pressed in the Machine Identification step, reenter the Manufacturer Password.
-
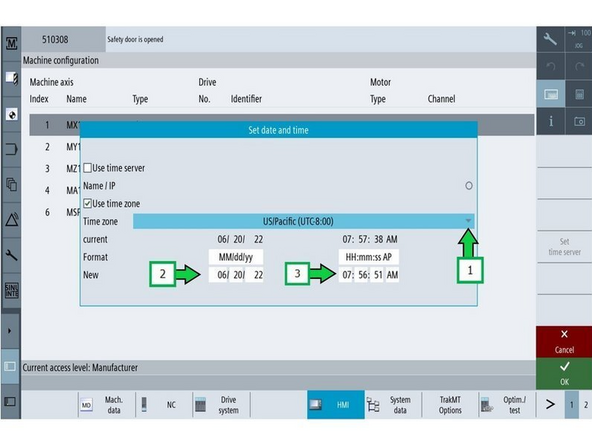
To set Date and Time: Go to [Setup] → [HMI] → [Date time].
-
Verify the date and time.
-
If necessary, adjust the time: Update to the correct time, then click [Accept] and [OK].
-
-
-
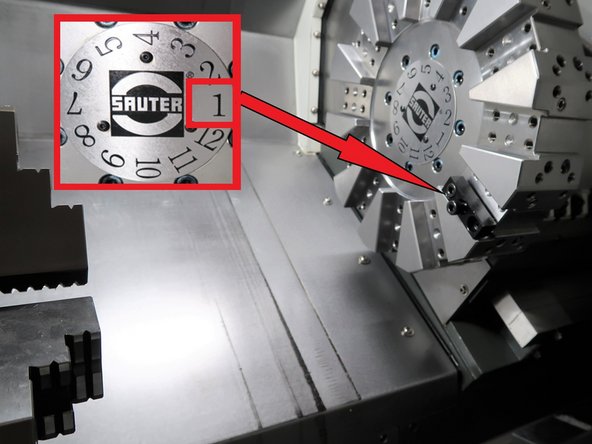
Close the machine door.
-
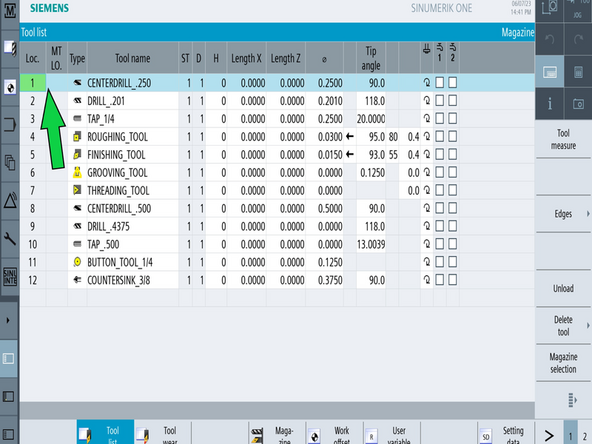
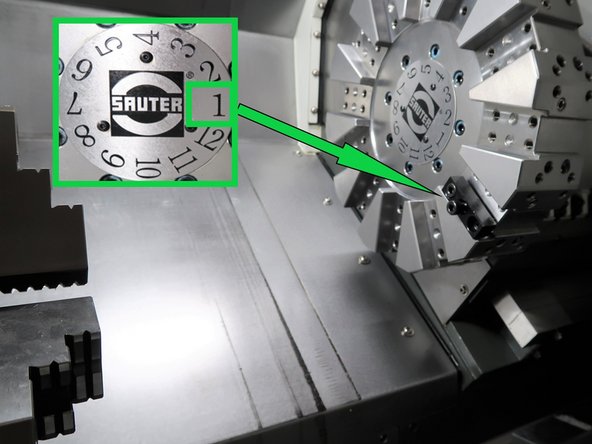
Go to [Machine] → [TSM] → [Select Tool]. Select Tool 1 and press [Cycle Start].
-
This will move the turret to Position 1
-
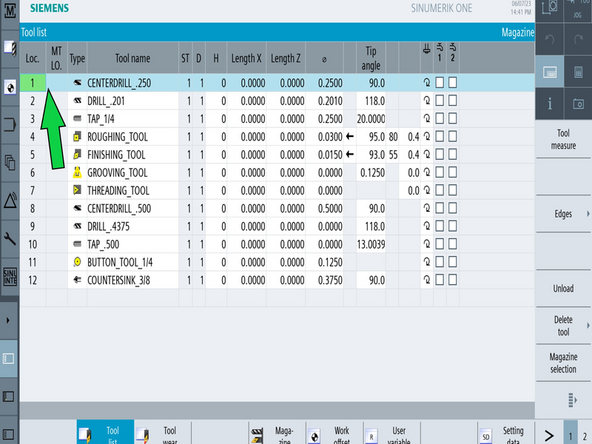
Go to [Tool List] (Left vertical, second button from top) and verify the turret position is at Tool 1.
-
The Machine should be on Position 1 matching the Tool List Position 1.
-
-
-
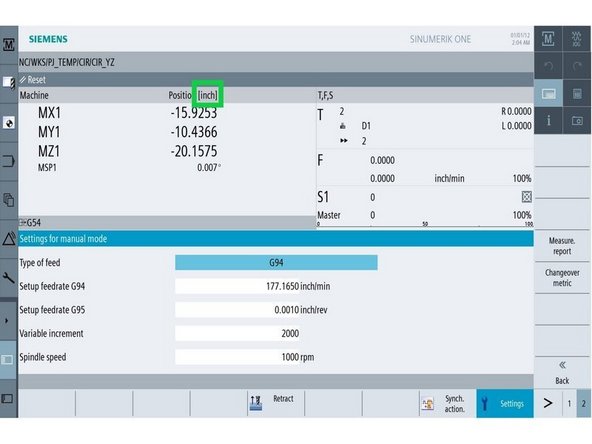
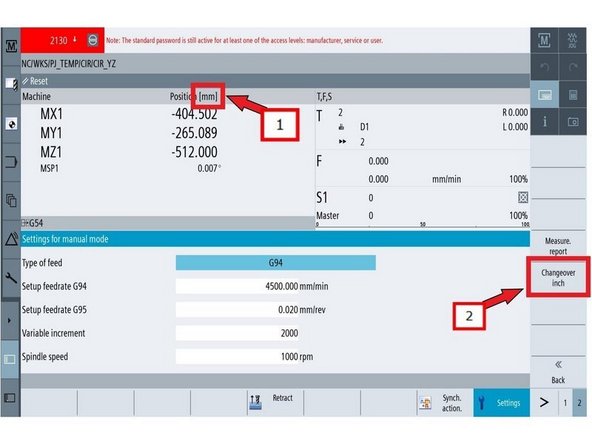
Go to [Machine] and verify the position banner shows inch.
-
If you need to change it: go to [Settings] → [Page 2], then press [Changeover inch].
-
Confirm the machine is now set to inch.
-
-
-
Press [E-Stop].
-
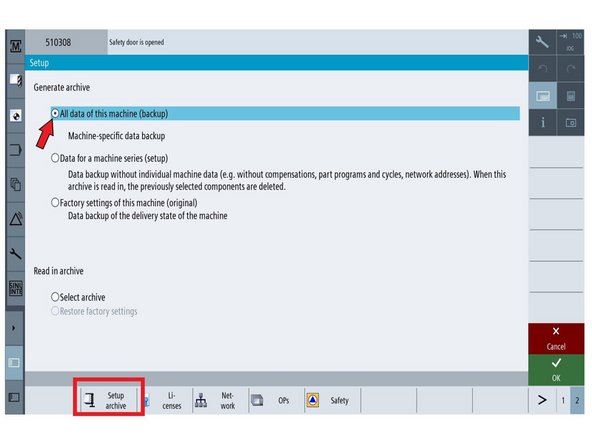
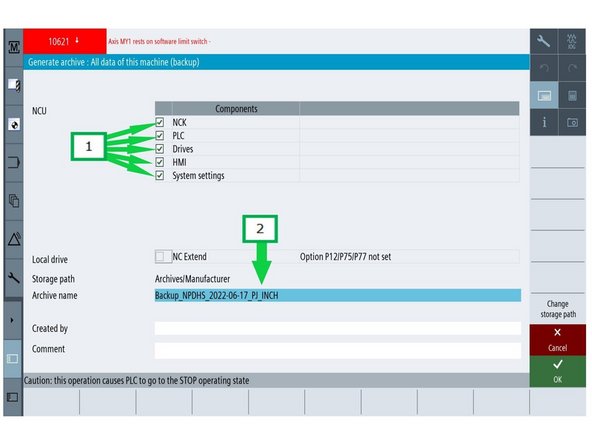
Go to [Setup] → [Page 2] → [Setup Archive] → [All data of this machine] → [OK].
-
(1) Make sure all boxes are checked.
-
(2) Select the [Archive name] field. Name the file Backup_NPDHS-YYYY-MM-DD_BEFORE_UPGRADE and press [OK].
-
YYYY-MM-DD is today's date. June 26, 2023 is written 2023-06-26.
-
The default storage path is [Archives/Manufacturer]. If it is anything else, press [Change storage path] → [Archive/Manufacturer] → [OK].
-
This screen also lets you save the archive to either USB port.
-
This archive is your way back if the upgrade goes wrong. Archive Current System before proceeding.
-
-
-
Power off the machine.
-
Remove the pendant rear cover. Insert the USB stick with the .usz file at the rear of the pendant, below the switch.
-
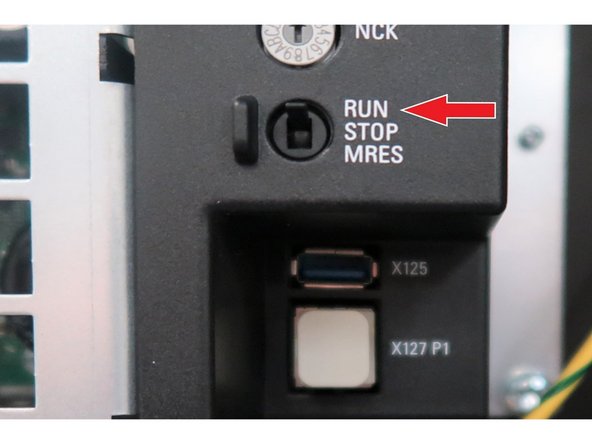
Move the switch from [RUN] to [STOP].
-
Power up the machine. The Package configuration screen opens.
-
-
-
Read the King Rich serial number on the electrical cabinet door.
-
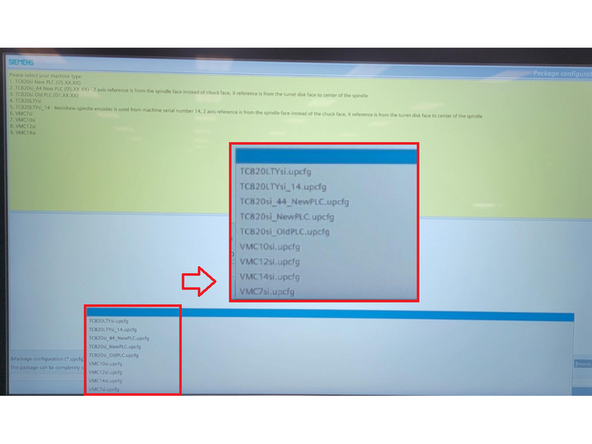
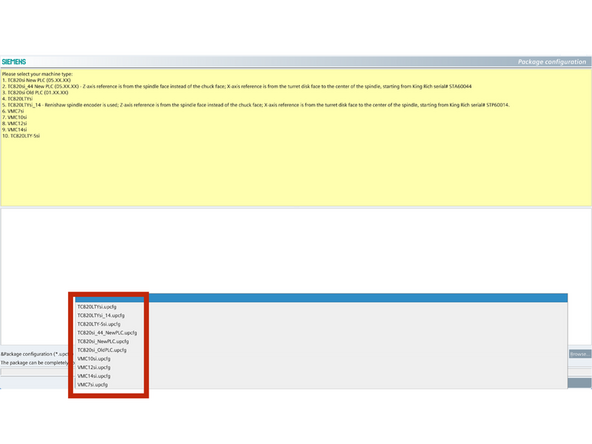
Click the down arrow and select the option that matches the PLC version from Step 2 and the serial number:
-
Old-PLC (01.XX.XX), any serial: select TC820si_OldPLC.upcfg.
-
New-PLC (05.XX.XX), serial STA60001 to STA60043: select TC820si_NewPLC.upcfg.
-
New-PLC (05.XX.XX), serial STA60044 and higher: select TC820si_44_NewPLC.upcfg.
-
It is extremely important to select the option that matches the machine model on the nameplate, the PLC version and the King Rich serial number. If the wrong option is chosen, you will need to load the archive saved in Step 11 and repeat the upgrade.
-
After selecting the option, press [Next].
-
-
-
The upgrade takes about 20 to 25 minutes if only the deployment file is applied, and about 45 to 50 minutes if the CNC software is also upgraded.
-
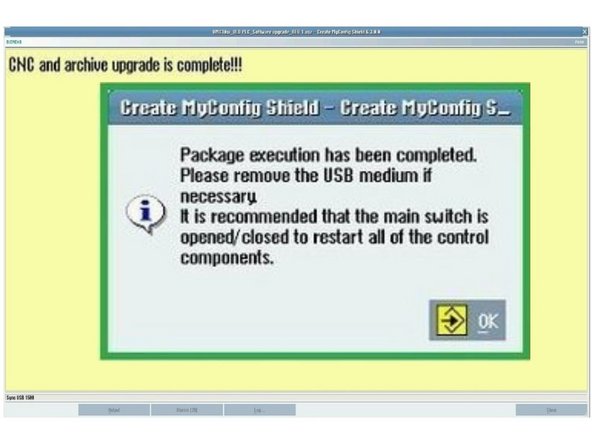
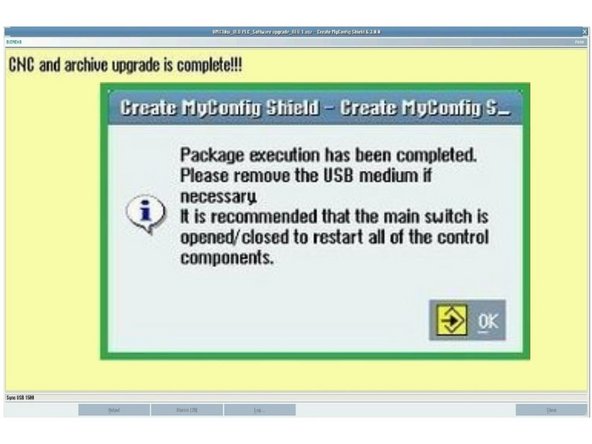
When the upgrade is complete, press [OK].
-
If the "Package Execution has been Completed" popup did not appear, or you see a red "Package Canceled" message at the top of the screen, the deployment did not run successfully. Contact TRAK Tech Support.
-
-
-
From the rear of the pendant, remove the USB stick. Set the switch to [RUN] while the machine is still powered. The machine interior lights come on.
-
Power cycle the machine.
-
If the switch was left in [STOP], the PLC will not start after the power cycle. The screen comes up, but the machine will not run and alarm 2000 "PLC sign-of-life monitoring" is shown.
-
To recover, with the machine on, move the switch to [STOP] and back to [RUN], then power cycle the machine again.
-
-
Verify date and time: [Setup] → [HMI] → [Date time]. Adjust if necessary.
-
Go to [Machine] → [TSM] and verify the TSM screen shows Position 1.
-
Go to [Tool List] and verify the turret position is at Tool 1.
-
-
-
Steps 16 to 21 are required only if you selected TC820si_OldPLC in Step 13. If you selected a New-PLC option, skip to Step 22.
-
Enter Manufacturer Password.
-
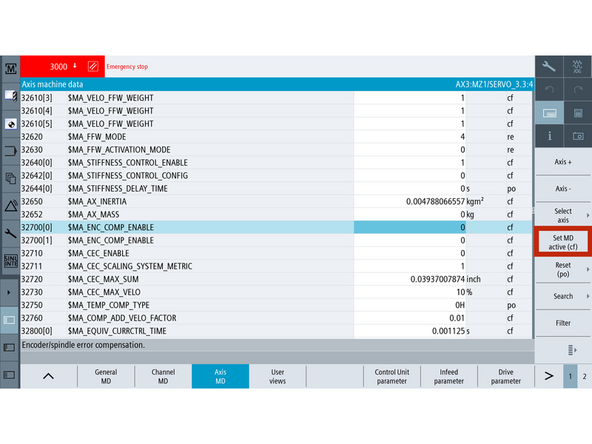
Go to [Setup] → [Mach. Data] → [Axis MD] → [Select Axis] → [AX3:MZ1].
-
Press [Search] and enter 32700[0] and press [Input].
-
Set 32700[0] parameter from 1 to 0.
-
Press [Set MD active (cf)].
-
-
-
Step 17 is required only if you selected TC820si_OldPLC in Step 13.
-
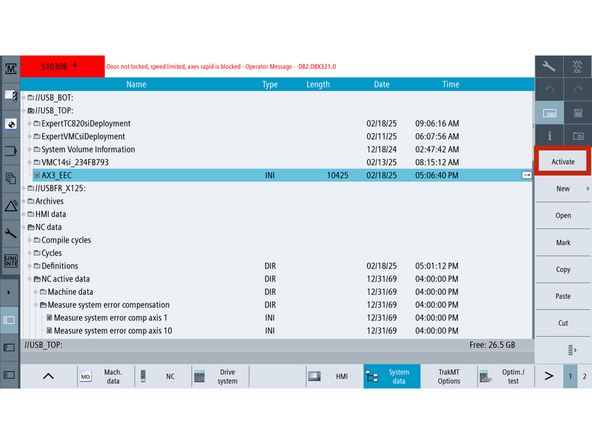
Go to [Setup] → [System Data] → USB location of AX3_EEC.ini from Step 5.
-
Press [Activate] on the right hand side.
-
Go to [Setup] → [Mach. Data] → [Axis MD] → [Select Axis] → [AX3:MZ1].
-
Press [Search] and enter 32700[0] and press [Input].
-
Set 32700[0] parameter from 0 to 1.
-
Press [Set MD active (cf)].
-
-
-
Step 18 is required only if you selected TC820si_OldPLC in Step 13.
-
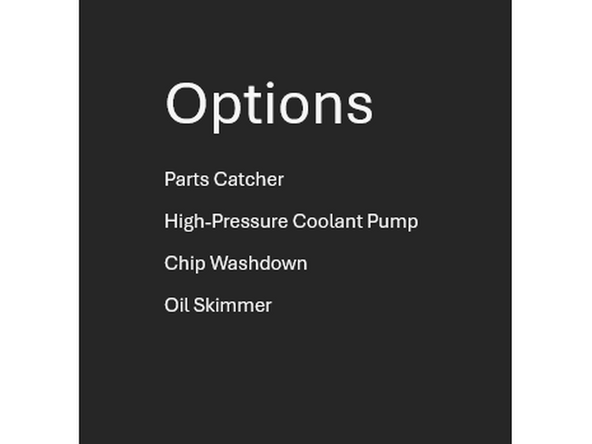
TC820si Old PLC (01.XX.XX) will need options enabled after Expert Deployment Upgrade. Determine which options the current machine has enabled.
-
Go to [Setup] → [Mach. Data] → [General MD] → [Search].
-
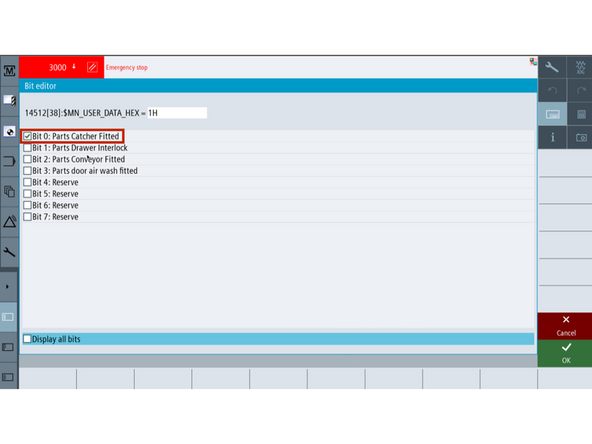
If Parts Catcher is installed:
-
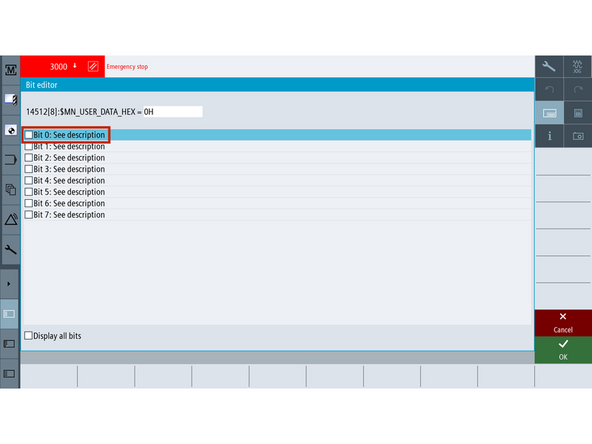
Set 14512[8] bit 0 = 0
-
Set 14512[38] bit 0 = 1
-
If an option is not active, set the relevant bit to 0.
-
-
-
Step 19 is required only if you selected TC820si_OldPLC in Step 13.
-
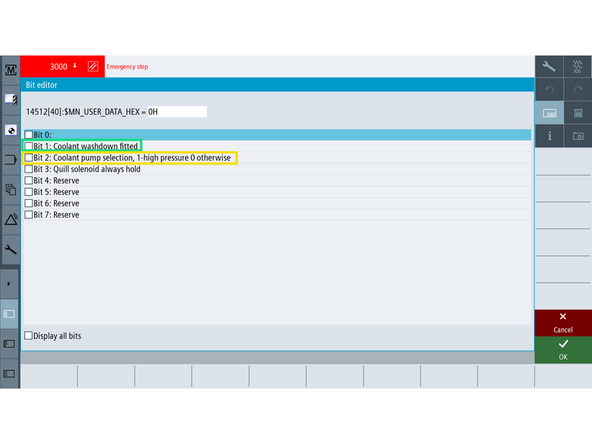
If Chip Washdown is installed:
-
Set 14512[40] bit 1 = 1
-
If High-Pressure Coolant Pump is installed:
-
Set 14512[40] bit 2 = 1
-
If an option is not active, set the relevant bit to 0.
-
-
-
Step 20 is required only if you selected TC820si_OldPLC in Step 13.
-
If Oil Skimmer is installed:
-
Set 14512[2] bit 0 = 0
-
Set 14512[2] bit 1 = 0
-
Set 14510[22] = 0
-
Set 14512[23] = 0
-
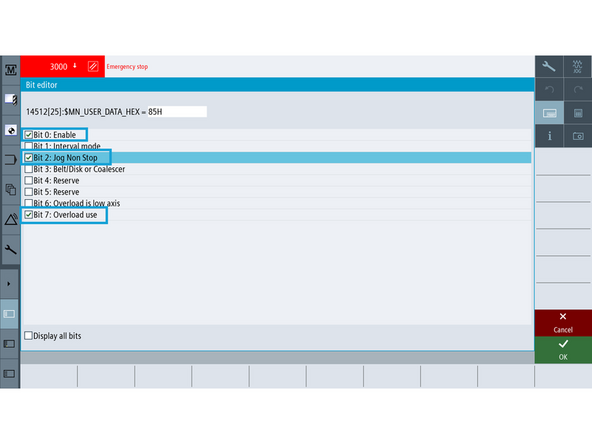
14512[25] Select Bit 0, Bit 2, Bit 7 to set variable to 85H
-
If an option is not active, set the relevant bit to 0.
-
-
-
Step 21 is required only if you selected TC820si_OldPLC in Step 13.
-
Verify If an option is not active, the relevant bit is set to 0.
-
Verify all installed options are functioning.
-
If an option is not working, check that the option bits in the previous steps are set correctly.
-
If the option bits are set correctly but the option still does not work, contact TRAK Customer Support.
-
If an alarm is active regarding an option that is NOT installed, contact TRAK Customer Support.
-
-
-
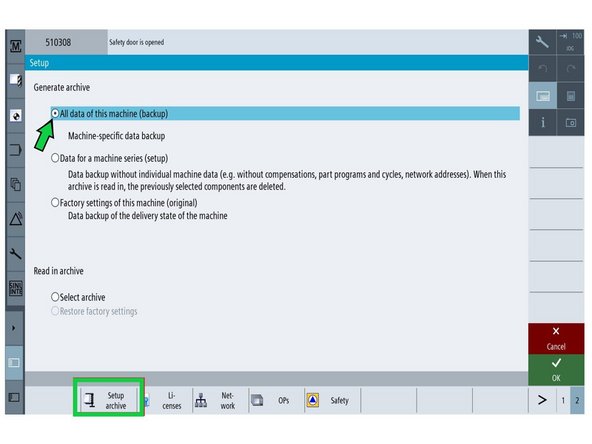
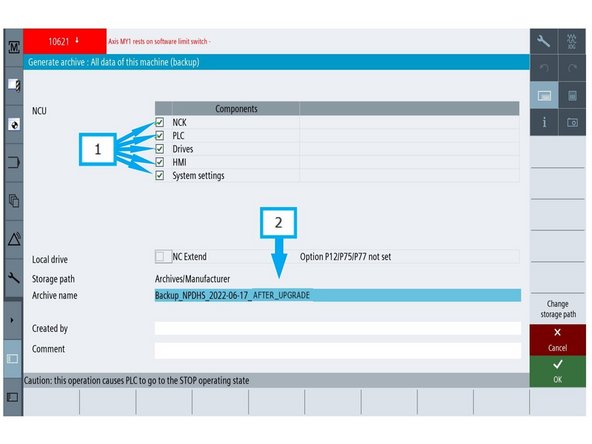
Go to [Setup] → [Page 2] → [Setup Archive] → [All data of this machine].
-
(1) Make sure all five components are checked.
-
(2) Select the [Archive name] field. Name the file Backup_NPDHS-YYYY-MM-DD_AFTER_UPGRADE and press [OK].
-
-
-
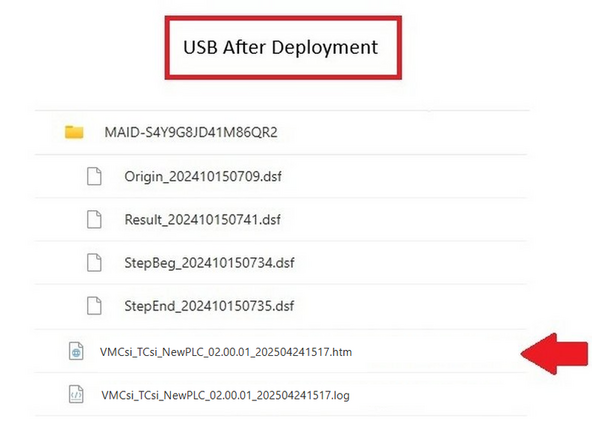
After deployment, the contents of the USB stick are shown with the HTML file highlighted.
-
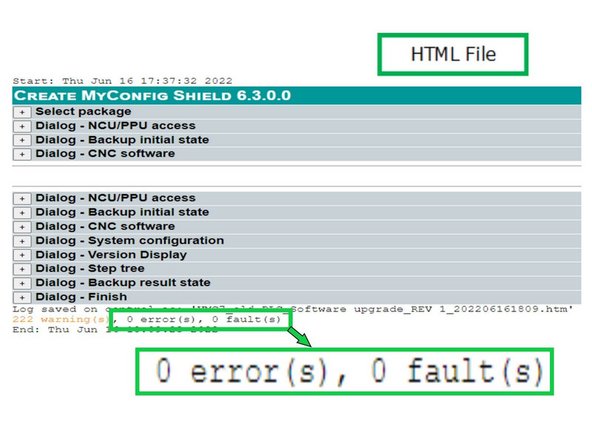
Open the HTML file on the Siemens control, or in a browser on a computer.
-
Near the bottom of the file, check the errors and faults fields. Both should read 0. If not, report it to TRAK Engineering.
-
-
-
Each machine has a config folder on SharePoint, created when it leaves the factory. Find it by serial number:
-
-
In the machine's folder, create a new folder named ExpertDeployment_Date, with Date replaced by the deployment date (for example ExpertDeployment_31NOV24).
-
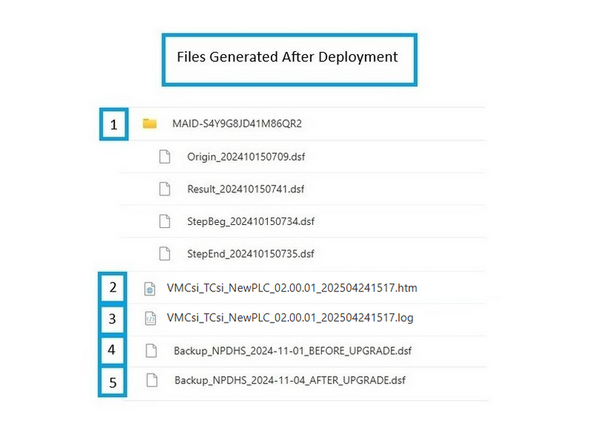
Copy these five items to it: (1) the complete MAID directory with its four files, (2) the HTML file, (3) the text document, (4) the BEFORE_UPGRADE archive from Step 11, (5) the AFTER_UPGRADE archive from Step 22.
-
Load all five items to the folder.
-
If you cannot find the machine's folder or cannot upload the files, please contact TRAK Tech Support. Do not skip this step: TRAK needs these files on record for every upgrade, and Tech Support will upload them for you.
-




Team