
Introduction
This guide provides a complete procedure for Axis Tuning using Auto Servo Tuning (AST) for VMCsi and TCsi machines to eliminate motor humming noise and reduce resonance.
-
-
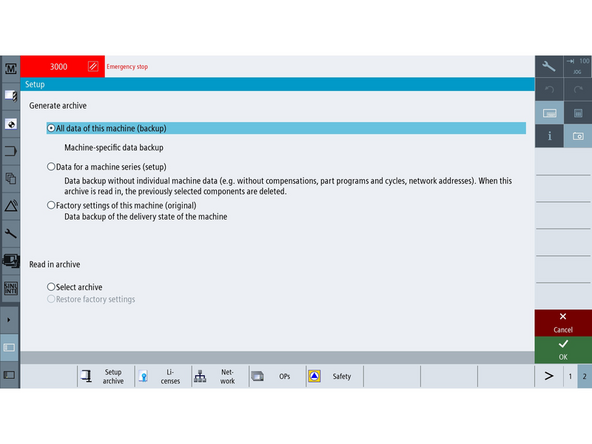
Archive the current system before making any changes.
-
-
-
-
Release [E-Stop] to enable drives.
-
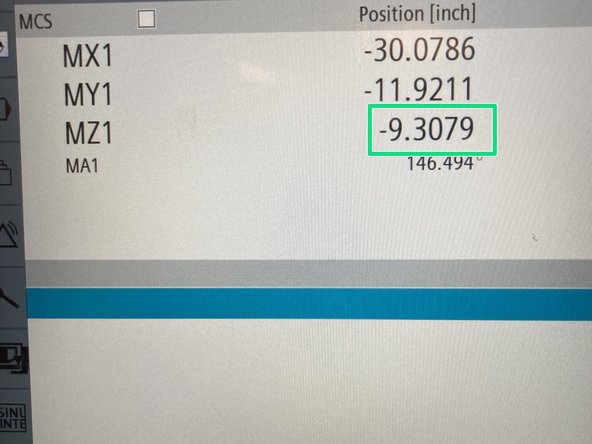
Jog all the axis to a safe tuning position. The center of travel is ideal.
-
-
-
Navigate to [Setup] → [Optim/test].
-
To clear the previous tuning history, select [Options] → [Clear History] → [Yes].
-
Set the "HMI Options with AST" as follows: check the first 8 boxes.
-
Press [OK] → [OK] to confirm.
-
-
-
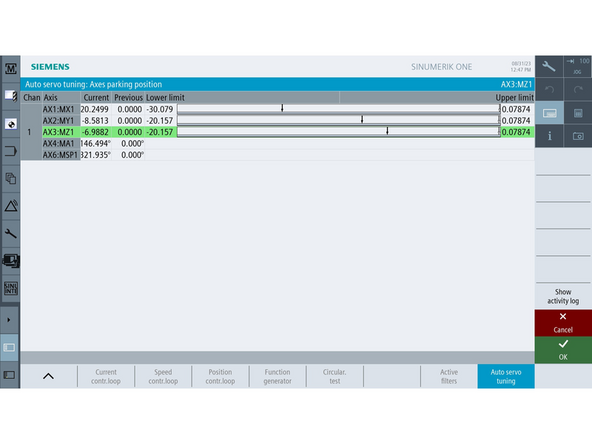
Select desired axis, then [Tune].
-
From the menu, select "Strategy 105. Measure and Retune Speed ctrl," then press [OK].
-
The position of the axes relative to the active soft limits is displayed. Ensure everything is positioned in a safe location, as the Z axis will move up to 6" in both positive and negative directions during testing.
-
Once the safe position is set, select [OK].
-
Proceed to Step 10.
-
-
-
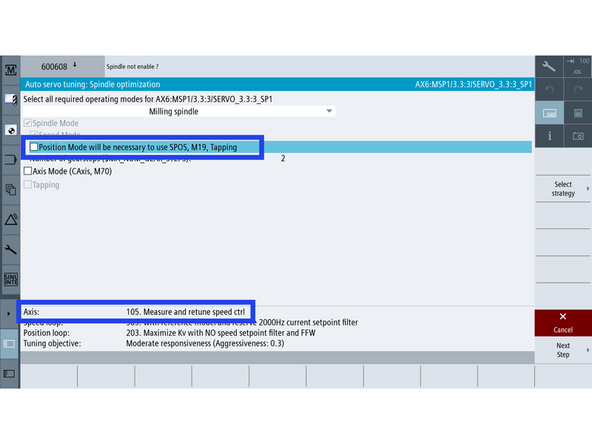
Select AX6:MSP1 from the axis selections on the left.
-
Select [Tune Spindle]. From the drop down menu Select [Milling Spindle]
-
If this is the first time running Auto Tune on the spindle:
-
Check the first available checkbox: “Position Mode will be necessary to use SPOs, M19, and Tapping.” At the bottom of the page the Axis should read 102. Measure and retune speed and pos ctrl.
-
If this is not the first time:
-
Deselect the checkbox mentioned above. At the bottom of the screen the Axis should read 105. Measure and retune speed ctrl
-
Press [Next Step] → [Tune] → [OK]
-
Proceed to Step 10.
-
-
-
Select AX6:MC1 from the axis selections on the left.
-
Select [Tune Spindle]. From the drop down menu Select [Turning Spindle]
-
Verify these are checked: (1) Position Mode will be necessary to use SPOs, M19, and Tapping. (2) Axis Mode (CAxis, M70). (3) Tapping
-
Press [Next Step] → [Tune] → [Speed]
-
Set 'Min integral time Tn: = 0.02s
-
Press [OK] to open the Auto Servo Tuning: Axis Parking Position screen, then press [OK] again to start Auto Tuning.
-
Proceed to Step 10.
-
-
-
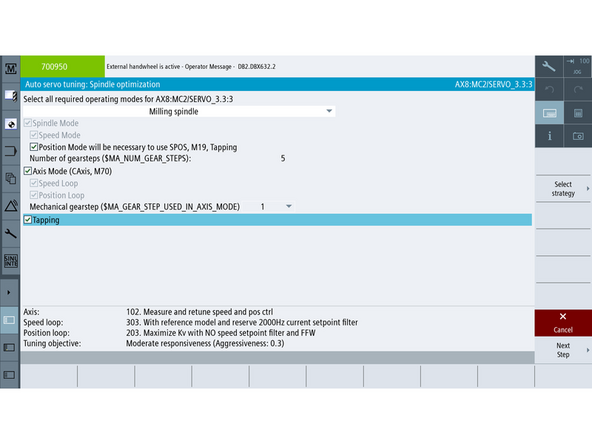
Select AX8:MC2 from the axis selections on the left.
-
Select [Tune Spindle]. From the drop down menu Select [Milling Spindle]
-
Verify these are checked: (1) Position Mode will be necessary to use SPOs, M19, and Tapping. (2) Axis Mode (CAxis, M70). (3) Tapping
-
Press [Next Step] → [Tune] → [Speed]
-
Set 'Min integral time Tn: = 0.02s
-
Press [OK] to open the Auto Servo Tuning: Axis Parking Position screen, then press [OK] again to start Auto Tuning.
-
Proceed to Step 10.
-
-
-
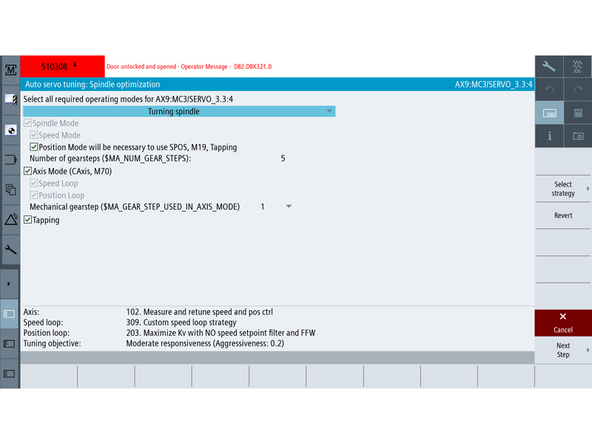
Select AX9:MC3 from the axis selections on the left.
-
Select [Tune Spindle]. From the drop down menu Select [Milling Spindle]
-
Verify these are checked: (1) Position Mode will be necessary to use SPOs, M19, and Tapping. (2) Axis Mode (CAxis, M70). (3) Tapping
-
Press [Next Step] → [Tune] → [Speed]
-
Set 'Min integral time Tn: = 0.02s
-
Press [OK] to open the Auto Servo Tuning: Axis Parking Position screen, then press [OK] again to start Auto Tuning.
-
Proceed to Step 10.
-
-
-
The following Message will appear. Press [Cycle Start]
-
Note: When [Cycle start] is actuated, the measurement process begins. The motor moves at a slow constant feedrate and the frequency response is measured. The measurement process can be stopped via the [Reset] key on the MCP or the [E-Stop].
-
There are 4 total automated tuning cycles. Each tuning cycle will require hitting a [Cycle Start] to initiate.
-
Prelim Speed ctrl. mech. plant. high freq.
-
Speed ctrl. mech. plant high freq.
-
Prelim Speed ctrl. mech. plant low freq.
-
Speed ctrl. mech plant. low freq.
-
Each tuning cycle will run for approximately 30 seconds, testing travel with different resonant frequencies.
-
-
-
After the 4 steps are completed, the controller review screen appears.
-
[Accept] to complete the re-tune process.
-
The following message appears which can be ignored because no changes are made to the position controller.
-
Click [OK]→[OK] to continue
-
Re-Tune process is complete. Test axis movement to confirm the problem is resolved.
-
-
-
Step 12 thru Step 16 applies only to VMC12/VMC14 Z axis tuning if humming sound persists after AST Strategy 105.
-
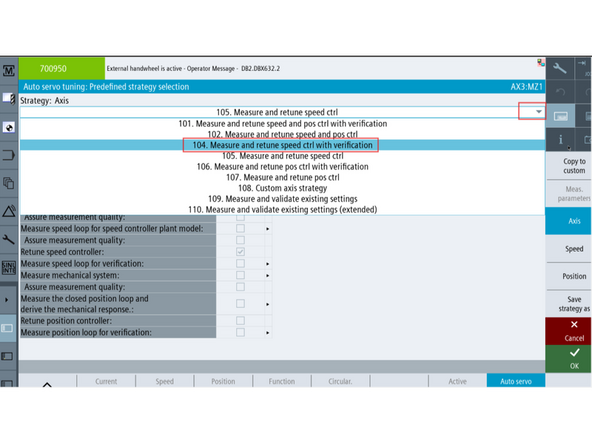
Return to the AST axis selection screen, select the Z axis (AX3:MZ1), then press [Tune] to reach the strategy selection screen.
-
From the drop-down menu, select "104. Measure and retune speed ctrl with verification".
-
Press [OK].
-
-
-
On the strategy screen, click the [>] arrow next to "Measure speed loop for verification".
-
Press [Meas. Parameters].
-
Change the following values:
-
Averages = 4
-
Amplitude = 1
-
Offset % = 0
-
Press [Back].
-
-
-
Press [Copy to custom], then press [Yes] to confirm copying the predefined strategy to the custom strategy.
-
Press [Speed].
-
On the Speed screen, press [Copy to custom].
-
Set Maximum bandwidth = 70 Hz.
-
Note: If humming persists after re-tune, try 60 Hz. If still present, try 50 Hz.
-
Uncheck "Use wide notch filters to consider deviations between series machines."
-
Press [OK].
-
-
-
Press [OK] to open the Auto Servo Tuning: Axis Parking Position screen.
-
Press [OK] again to start Auto Tuning.
-
Follow Step 10 to run all 4 measurement cycles, then Step 11 to accept the controller review.
-
-
-
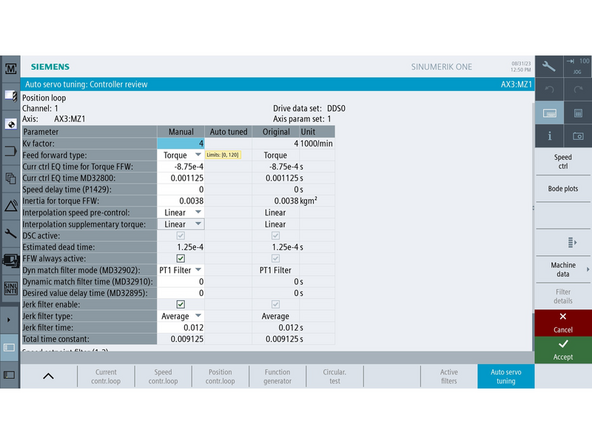
After tuning completes, the Controller review screen appears.
-
Press [Speed Ctrl] to view the speed control data changes.
-
Review the updated drive data — note the changes to Proportional gain Kp and Reference model frequency.
-
Press [Accept], then press [OK].
-
If humming still persists after retune at 50 Hz bandwidth, proceed to Step 17 (Adjust Speed Controller Gain).
-
-
-
If the Autotune fails, proceed with this step to reduce the speed controller gain.
-
Set Manufacture Password.
-
Navigate to [Setup] → [Mach Data] → [Drive Parameter] → Press [Select a Drive] to choose the desired drive for the Auto Tune procedure.
-
[Search] → 1460 → [OK]
-
Set Parameter 1460 to 70% of its current value.
-
Cancel Search → [Save/Reset] → [Save] → [Current DO]
-
After making adjustments, restart the tuning process from Step 5.
-
-
-
Put the machine in E-Stop
-
Make a final archive to back up the changed data
-
-
-
-
Upload both archives from before and after tuning to the Sharepoint Configs Page. Machines are sorted by type and serial number.
-
-


![Release [E-Stop] to enable drives.](https://d3t0tbmlie281e.cloudfront.net/igi/trakmtsupport/hyEU5fqhMQHH2rfV.medium)
![Navigate to [Setup] → [Optim/test].](https://d3t0tbmlie281e.cloudfront.net/igi/trakmtsupport/fDilMPRNOWGZqnMr.medium)
![To clear the previous tuning history, select [Options] → [Clear History] → [Yes].](https://d3t0tbmlie281e.cloudfront.net/igi/trakmtsupport/RhHGgJT1YUgwmyvN.medium)
![Select desired axis, then [Tune].](https://d3t0tbmlie281e.cloudfront.net/igi/trakmtsupport/XKQVObpNJskAiJuW.medium)
![From the menu, select "Strategy 105. Measure and Retune Speed ctrl," then press [OK].](https://d3t0tbmlie281e.cloudfront.net/igi/trakmtsupport/kr6sKIiUQNiH2fJc.medium)

![Select [Tune Spindle]. From the drop down menu Select [Milling Spindle]](https://d3t0tbmlie281e.cloudfront.net/igi/trakmtsupport/frIQLWRMRMCxoQUU.medium)

![The following Message will appear. Press [Cycle Start]](https://d3t0tbmlie281e.cloudfront.net/igi/trakmtsupport/PYDK6aSrIKCUlfhZ.medium)
![[Accept] to complete the re-tune process.](https://d3t0tbmlie281e.cloudfront.net/igi/trakmtsupport/QU3hKQqmcCVH3CsW.medium)
![On the strategy screen, click the [>] arrow next to "Measure speed loop for verification".](https://d3t0tbmlie281e.cloudfront.net/igi/trakmtsupport/C42Z3MRN5QChA1wj.medium)
![Press [Meas. Parameters].](https://d3t0tbmlie281e.cloudfront.net/igi/trakmtsupport/CRDk3MRNyjCJkajy.medium)
![Press [Copy to custom], then press [Yes] to confirm copying the predefined strategy to the custom strategy.](https://d3t0tbmlie281e.cloudfront.net/igi/trakmtsupport/DEVY3MRNNpCGxiOk.medium)
![Press [Speed].](https://d3t0tbmlie281e.cloudfront.net/igi/trakmtsupport/EZTm3MRNExSeXIXe.medium)
![On the Speed screen, press [Copy to custom].](https://d3t0tbmlie281e.cloudfront.net/igi/trakmtsupport/DGn43MRNtRChA1wj.medium)
![Press [OK] to open the Auto Servo Tuning: Axis Parking Position screen.](https://d3t0tbmlie281e.cloudfront.net/igi/trakmtsupport/ADMk3NRNhGCJkYKk.medium)

![Press [Speed Ctrl] to view the speed control data changes.](https://d3t0tbmlie281e.cloudfront.net/igi/trakmtsupport/gNkA3NRNkDCHXlhb.medium)


Cancel: I did not complete this guide.
One other person completed this guide.