
Introduction
The SINUMERIK ONE SD card holds the machine's system software, its configuration, and its software licenses. Replacing it is not a straight swap. The licenses are bound to the card's hardware serial number, so they must be transferred to the new card through Siemens, and the machine's configuration has to come from an archive.
-
-
Scenario A, the card has failed. The machine will not boot and no current archive can be taken. The customer calls the Customer Service Group, a Repair Order is generated, and the replacement card ships loaded with the most recent archive on file for that machine.
-
That may be an archive taken during a later service visit, or it may be the one taken before the machine shipped. The machine comes back to whatever state that archive captured, and everything changed since it was taken is gone.
-
Go to Step 2.
-
Scenario B, the card still reads. The card is being replaced for another reason and the machine still runs. A fresh archive is taken off the machine immediately before the swap and restored afterward. The machine comes back exactly as it was.
-
Go to Step 3.
-
-
-
Customer calls the Customer Service Group (CSG) to request a replacement SD Card.
-
A Repair Order is generated to replace the faulty SD Card. A sample Sales Order from purchasing is available, but it is not the specific Sales Order for the SD Card.
-
A new SD Card will be shipped with the same archive that the machine was originally configured and shipped with.
-
Refer to Dozuki procedure:
-
Restore From Archive This procedure will give the new SD card the same configuration as the machine had with the old SD card.
-
If customer bought additional licenses after the machine was shipped, those licenses need to be activated separately. Refer to guide How to Load and Activate Siemens Licenses
-
Go to Step 6.
-
-
-
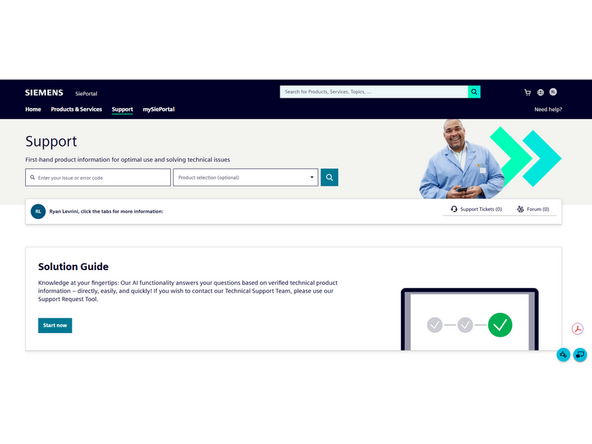
Open a support request with Siemens to move the licenses from the old card serial to the new card serial.
-
-
Select “SINUMERIK ONE License” as the product. In "Request details", provide both the old and new SD card serial numbers and the reason for the change. Provide proof of license, such as a scan or PDF of the Certificate of License (CoL/eCoL) and photos of both SD cards.
-
Siemens returns a license file named LK_<new card serial>.zip.
-
-
-
Home all axes to their reference positions, MCS zero.
-
Confirm there is no tool in the spindle and the ATC is at its reference position.
-
Press E-Stop
-
Go to [Setup] > [Set Password], enter the manufacturer password, press [OK].
-
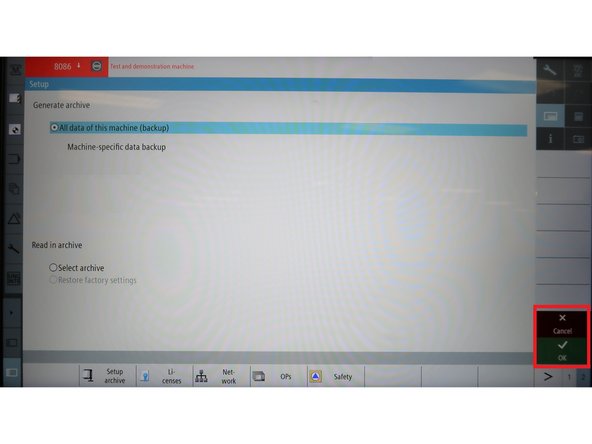
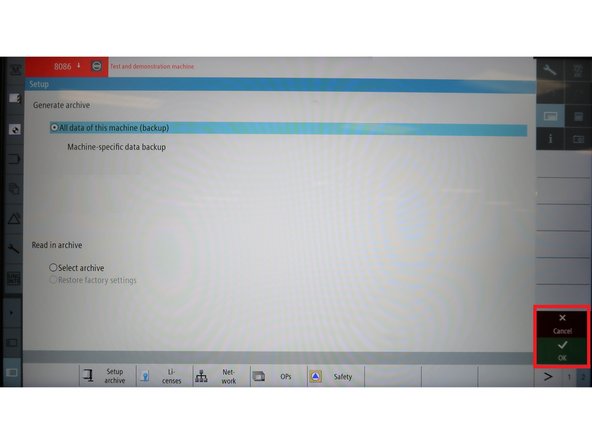
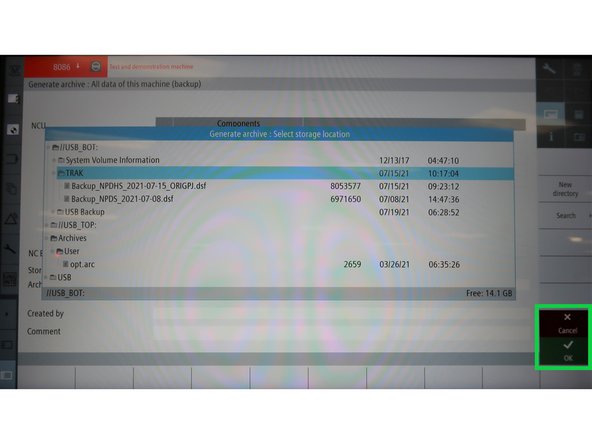
Go to [Setup] > [Page 2] > [Setup Archive] > [All data of this machine (backup)] > [OK].
-
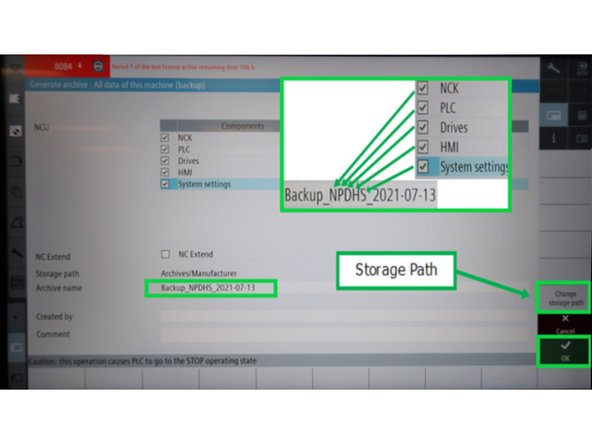
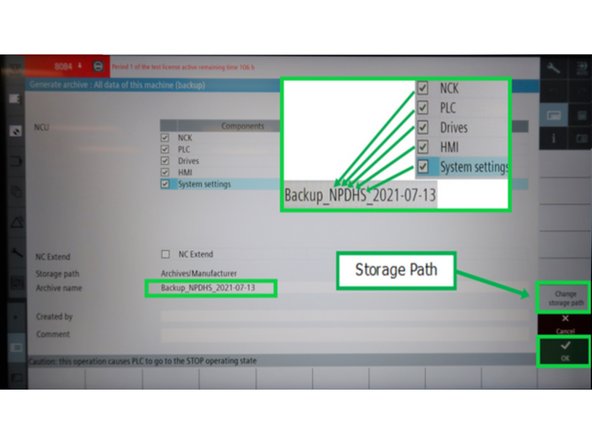
Leave every component checked: NCK, PLC, drives, HMI, compile cycles. Press [OK].
-
Wait for the confirmation message. The keyboard lights flash together while it runs. Approximately 1 minute.
-
-
-
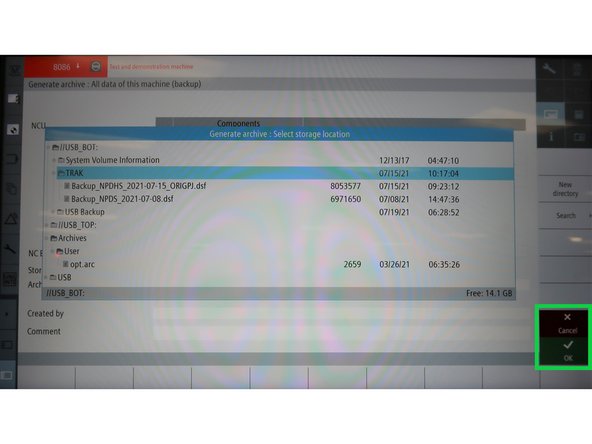
Go to [Setup] > [System data]
-
Navigate to Archives > Manufacturer.
-
Select the archive and press [Copy].
-
Select the USB, top or bottom, and press [Paste].
-
-
-
Press E-Stop, then turn off the machine by turning the breaker on the electric panel cover counterclockwise.
-
Remove the rear pendant cover by loosening all eight 6 mm hex screws.
-
Note the inset photo showing the slots for the screws. You can lift the rear panel cover off easily by clearing the slots and then find a safe place to store it.
-
Pendant back cover is heavy.
-
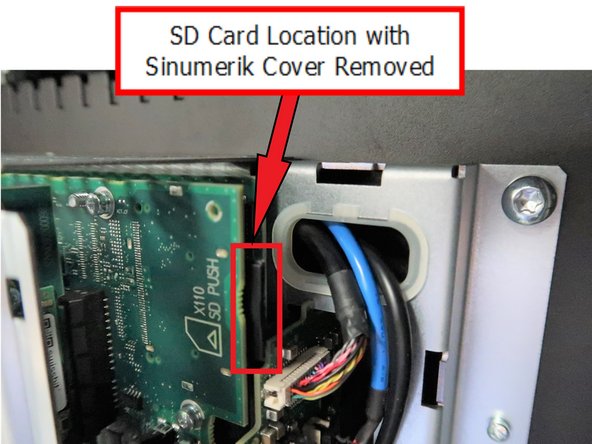
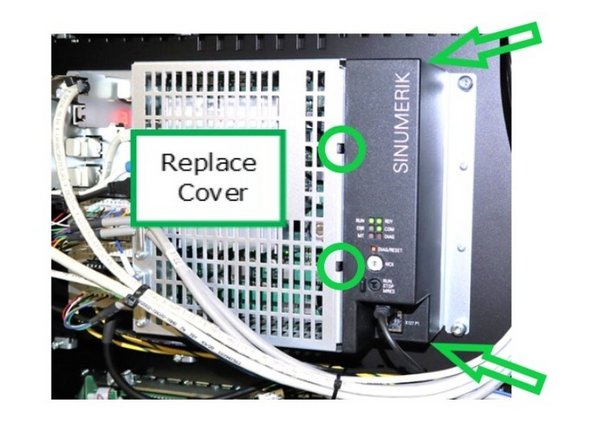
Press the top, bottom, and side tabs of the plastic cover on the back of PPU1740, as shown by the arrows, to release the cover. The SD Card is located in the top area under the circuit board.
-
-
-
The SD Card is located on the top right behind the plastic cover.
-
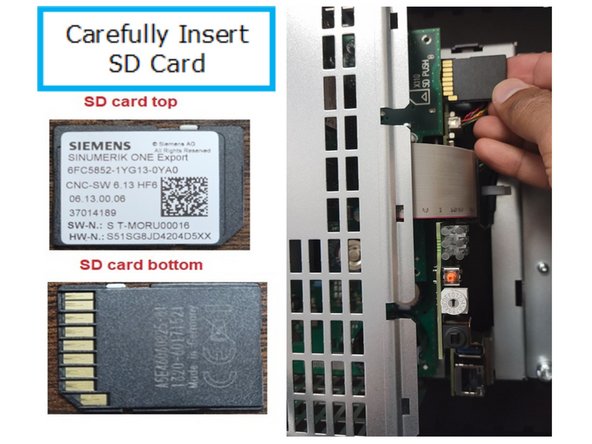
Gently press the SD card inward to remove it, then insert the new SD card into the slot and press it until it locks into place.
-
Carefully align the side, top, and bottom tabs, then push the cover in place.
-
Place the back metal cover of the pendant into position. Use an allen key to fasten the cover.
-
Turn on the machine power.
-
-
-
Press E-Stop.
-
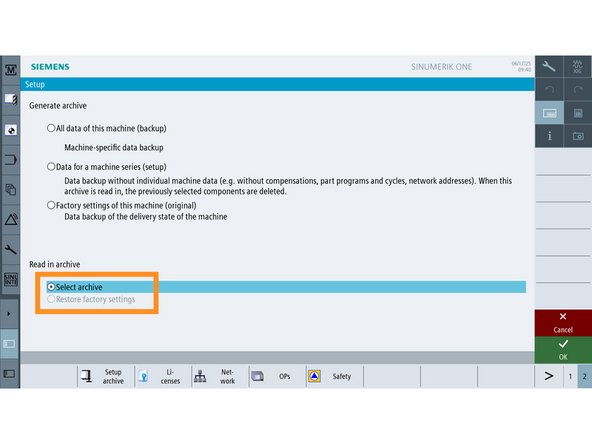
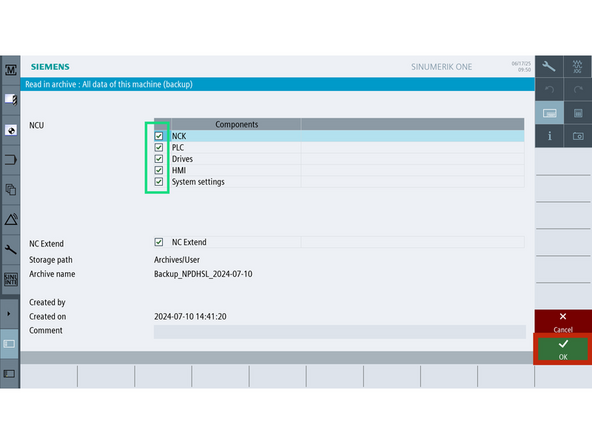
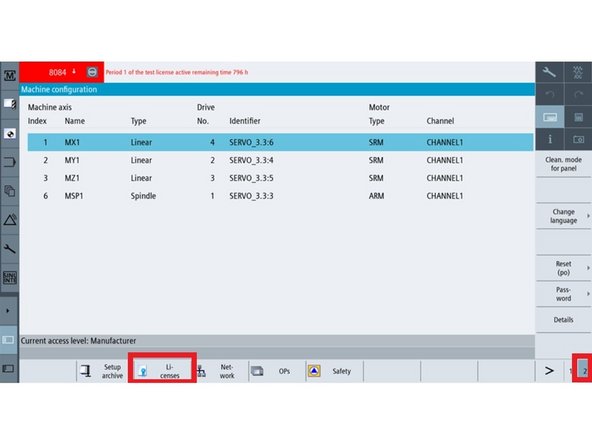
Go to [Setup] > [Page 2] > [Setup Archive]. Under Read in Archive, press [Select Archive].
-
Select the archive taken in Step 4.
-
Leave all components checked unless Technical Support has told you otherwise. Press [OK].
-
Wait for the confirmation.
-
Accept the soft reboot prompt and let the control restart.
-
-
-
Insert the USB carrying License Zip.
-
Go to [Setup] > [Set Password], enter the manufacturer password, press [OK].
-
Go to [Setup] > [Page 2] > [Licenses].
-
Press [Read in license key], browse to the .zip and press [OK].
-
Go to [All Options] and press [Set option acc. lic.].
-
The button greys out, confirming activation.
-
Press [Reset (po)] and let the control come back up.
-
-
-
Take a fresh full archive and send back to TRAK Customer Service.
-

![Go to [Setup] > [System data]](https://d3t0tbmlie281e.cloudfront.net/igi/trakmtsupport/xUdQkPRNmoCJvXnB.medium)


![Go to [Setup] > [Page 2] > [Setup Archive]. Under Read in Archive, press [Select Archive].](https://d3t0tbmlie281e.cloudfront.net/igi/trakmtsupport/cQYNkQRNEJK2W6xu.medium)
![Go to [Setup] > [Set Password], enter the manufacturer password, press [OK].](https://d3t0tbmlie281e.cloudfront.net/igi/trakmtsupport/lFlGkQRNVKCJvXnB.medium)
![Go to [Setup] > [Page 2] > [Licenses].](https://d3t0tbmlie281e.cloudfront.net/igi/trakmtsupport/n2hfkQRNTvK2W6xu.medium)
Cancel: I did not complete this guide.
2 other people completed this guide.

Team
