

Overview
The setup consists of two parts:
- Configure the Windows PC to host a shared folder
- Configure the SINUMERIK ONE to map that folder as a logical drive
Both steps are required for file transfer.
Program execution from the network requires an additional license.
Part 1 — Configure the Windows PC
Step 1 — Verify Network Configuration
- Connect the PC to the same network as the SINUMERIK ONE
- Assign a static IP address if required
- Ensure Internet Protocol Version 4 (TCP/IPv4) is enabled on the Ethernet adapter.
- Open Settings
Navigate to Network & Internet
Select Advanced network settings
Under More adapter options, select Edit
The Network Connections window will open
Right-click Ethernet → Properties
Step B — Set a Static IPv4 Address
Select Internet Protocol Version 4 (TCP/IPv4)
Click Properties
Select Use the following IP address
Enter:
IP Address: 192.168.100.10
Subnet Mask: 255.255.255.0
Default Gateway: (leave blank)
Click OK
Close all network windows
Step 2 — Enable Windows File Sharing (SMB)
- Open Settings
- Navigate to System → Optional features
- Select More Windows features
- The Turn Windows features on or off window will open
In the Windows Features window:
- Expand SMB 1.0/CIFS File Sharing Support
- Enable all three options:
- SMB 1.0/CIFS Automatic Removal
- SMB 1.0/CIFS Client
- SMB 1.0/CIFS Server
- Click OK
- Restart the PC if prompted
Part 2 Configure the Sinumeric One
Step 1 — Log in as Manufacture Password
- Navigate to [Setup] → [Set Password]
- Enter the manufacturer password: TRAKmt2021
Step 2 — Access the Logical Drives Configuration
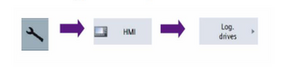
- Navigate to [Setup] → [HMI] → [Log. drives]
Step 3 — Create a New Network Drive Entry
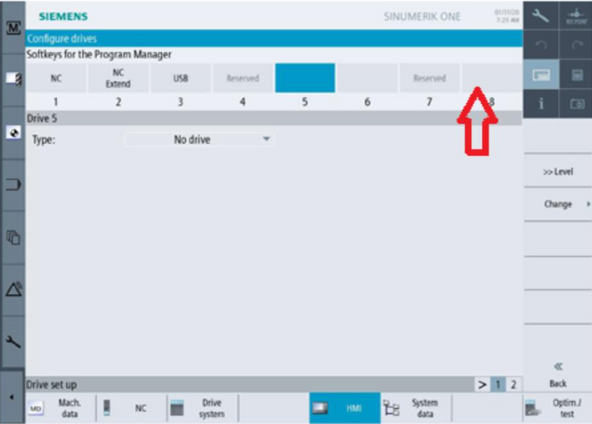
- Along the top, press [Soft Key 8]
- Press [Change]
- Select [Type]
- From the drop-down list, choose NW Windows.
- A network configuration screen will appear.
Step 4 — Enter Network Share Information
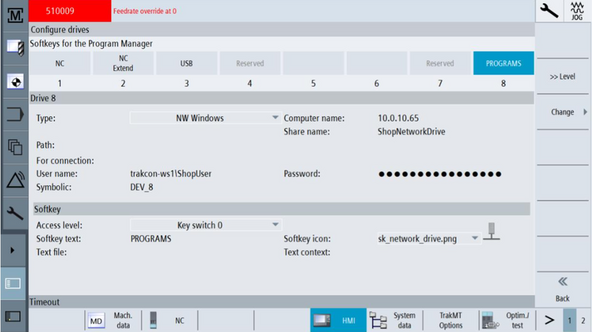
Enter the following fields using your network details:
- Computer Name
- Hostname or IP address of the Windows PC
- Share Name
- Name of the shared folder
- User Name
- Windows user account with permission to access the share
- Password
- Password for the Windows user account
- Softkey Text
- Name that will appear on the control (example: PROGRAMS)
- Access Level
- Set to the lowest required key switch level (typically Key Switch 0) so operators can access the drive without elevated permissions
Step 5 — Enable Program Execution From Network (Optional)
License Required — MEM-EXTERNAL (P75), Siemens P/N 6FC5800-0BP75-0YB0
- Part programs can only be executed from a network drive when MEM-EXTERNAL (P75) is installed.
- Without this option, the drive is limited to file storage and transfer.
To enable execution from the network:
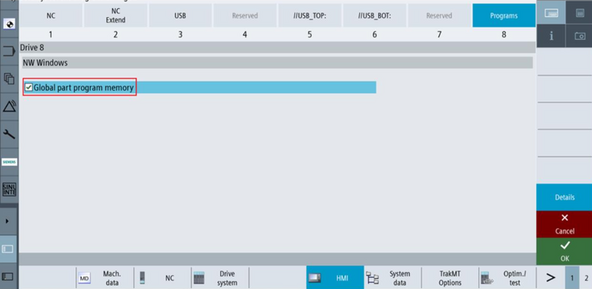
- Press [Details]
- Enable Global part program memory
Step 6 — Save and Connect
- Press [OK] to save the configuration.
- The control will attempt to connect to the network share.
- A “Please wait” message may appear briefly.
Step 7 — Verify the Network Drive
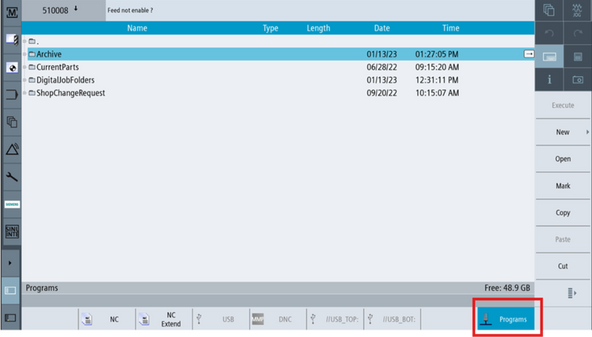
- Open Program Manager.
- Confirm the new drive appears as a bold softkey.
- Open the drive and verify files are visible.
0 Comments