Introduction
Trak Machine Tools has started offering a series of automation options on our VMCsi and TCsi series machines, one of them being Automatic Doors. With this procedure you will be able to program the servo drive for the Auto Doors to achieve optimal performance. To do this you will need a laptop, A USB to micro USB cable a copy of Clear Path MSP 2.0 software and the current configuration files.
-
-
To program the Auto Door motor and mechanical system on the VMC and TC820 series machines you will need a laptop, a copy of Clear Path 2.0 software, the configuration files, and a USB to Micro USB cable.
-
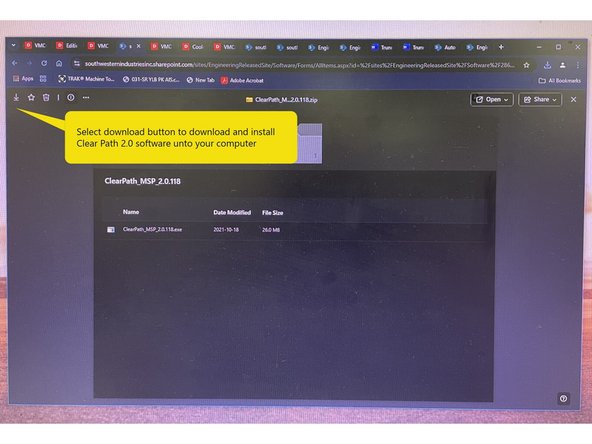
Use the share point link below to access the Clear Path Software you will need to program the motor and mechanical system. Download and install it onto your computer: https://southwesternindustriesinc.sharep...
-
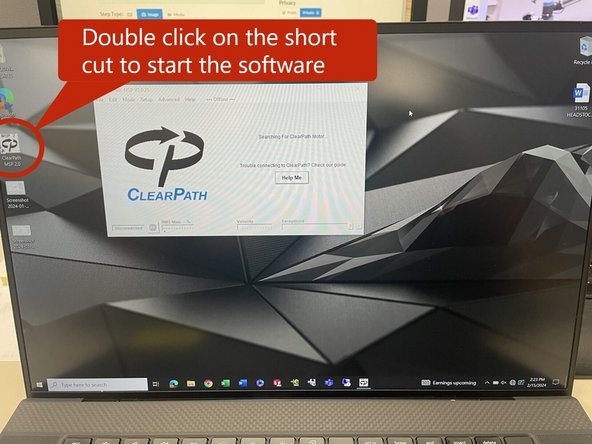
Once the Clear Path software has been loaded onto your laptop double click on the desk top short cut to start the Clear Path MSP 2.0 software.
-
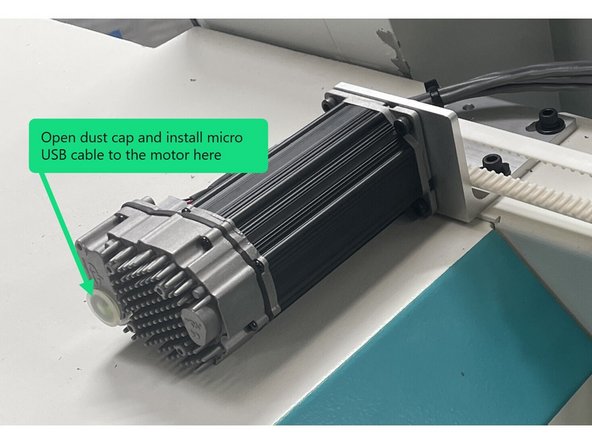
Once the software has started attach the micro usb end of the cable to the motor and the other end of the usb cable to the laptop. Depending on your laptop this could be USB 2.0, 3.0, or USB C.
-
-
-
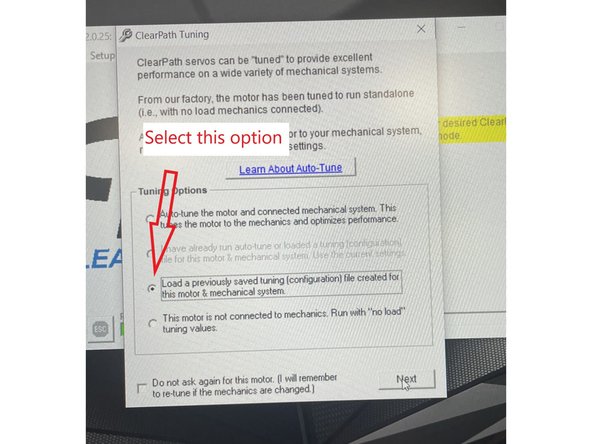
Once the PC is attached to the motor for the first time the software will search for the motor and the tuning options screen will come up. The default is "Auto tune the motor and connected mechanical system..." We want to select "Load a previously saved tuning(configuration) file created for this motor & mechanical system" then hit next.
-
Now the main screen in Clear Path will display. Now if you open the door to the home switch you should see a blue dot in "Input B Home Switch".
-
If the PC has been attached to the motor or the motor has been programed before the clear path software will start on the main screen.
-
The following link takes you to the configuration files for the VMC Auto Front and side doors and the Auto door for the TC820si and TC820LTYsi machines. Select the link and download the file you need to your downloads folder.
-
Auto Door configuration file Links: (https://southwesternindustriesinc.sharep...)
-
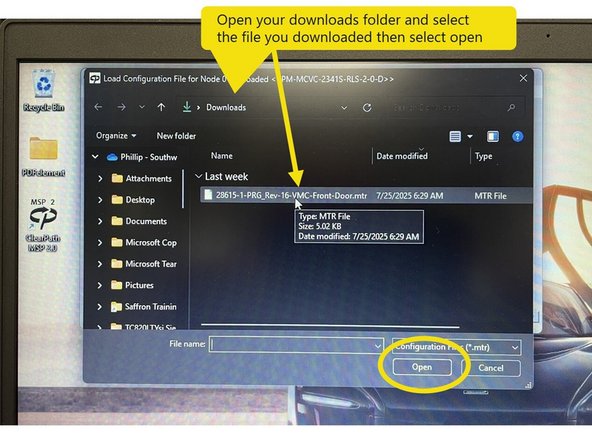
From the main screen select [file], [Load Configuration], then in the search bar open your downloads folder and select the file you downloaded and select [open], this will load the configuration file into your Auto Door motor.
-
-
-
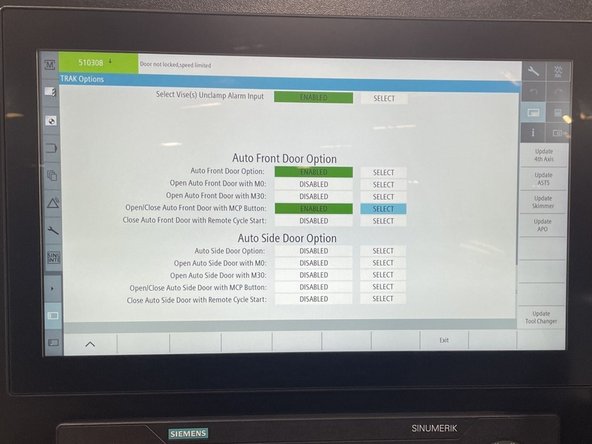
To enable the Auto Door in the Siemens Control select the Settings (Wrench) vertical soft key (VSK) and then the "TRAKMT Options" key. Scroll down to the "Auto Door" options and select the enable key for the Auto Door you are working on. Then select the enable key for "Open/Close With MCP Button".
-
-
-
To set the position of the open and closed state, start by opening the door half way. Next hit the Auto Door switch on the Siemens control panel, this will open the door all the way. Note: the first time the Auto Door is triggered after power up or E-Stop the door will go find the open switch.
-
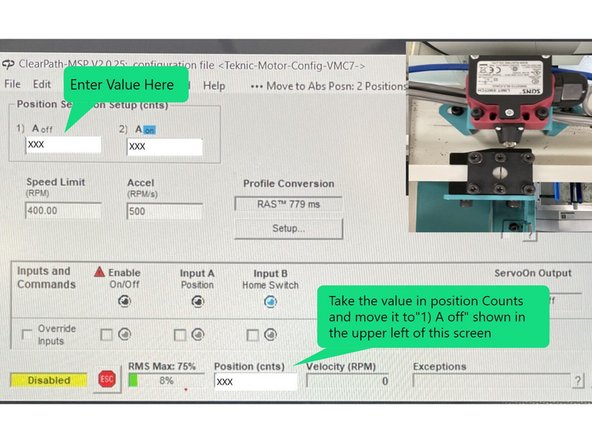
Now physically move the door to the mid point of the door open switch bracket. Read the value in the "Position Counts" text box at the bottom of the main page and enter that value into the "Position Selection Setup" "1) A off" text box in the upper left of the main page. Note: be sure the door is not latched in the open position.
-
Note: For auto side doors, disable the Auto Side Door Option in the Siemens control to physically move the door. Enable the Auto Side Door Option after entering the "1) A off" value
-
Note: be sure the door is not latched in the open position.
-
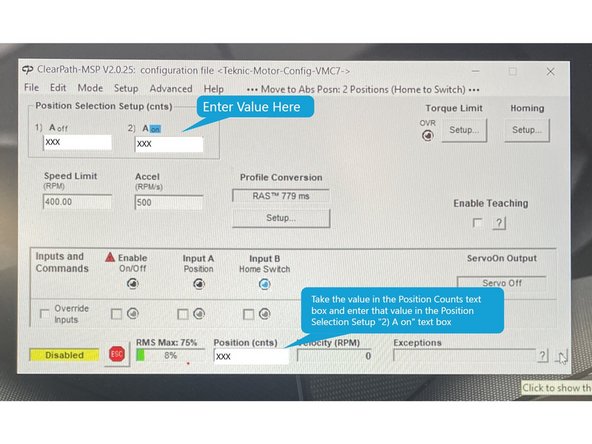
Next close the door completely and Read the value in the "Position Counts" text box at the bottom of the main page and enter that value into the "Position Selection Setup" "2) A on" text box in the upper left of the main page.
-
Note: Make sure the switch is on the middle of the cam when the door is completely closed.
-
The position count values for "A on" and "A off" will vary slightly from machine to machine.
-
-
-
Now that the door open and closed positions have been set you should verify that the door locks when it is closed.
-
Skip this step if installing the Auto Side Door Option
-
To verify the door locks when closed press the door open/close switch and close the door. Once closed try to reopen it manually, it should be locked and not reopen.
-
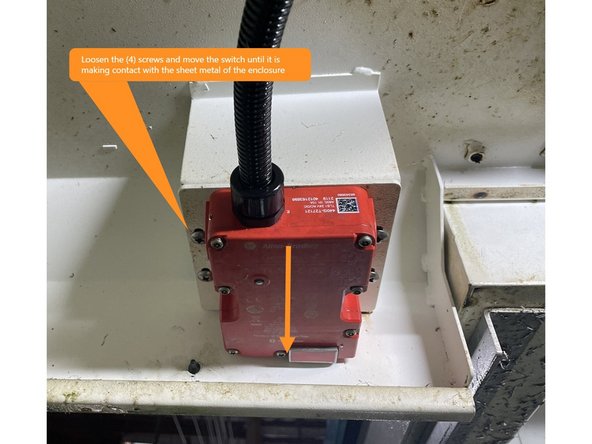
If the door reopens, check the adjustment of the door open/close switch. Loosen the four (4) mounting screws and adjust the switch so that it is making contact with the sheet metal of the enclosure. Open and close the door again and test the lock. See Photo 1
-
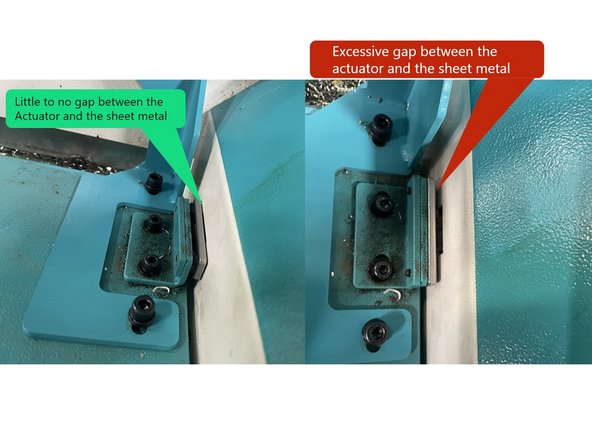
If the door still doesn't lock check the actuator, there should be little to no gap between the switch actuator and the cabinet sheet metal. You may need to put a washer or two between the actuator and the actuator mounting bracket to get the door to lock. See Photo 2
-
-
-
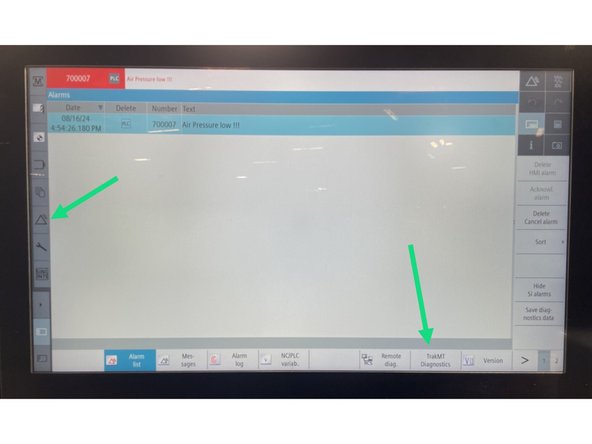
In order to check the Auto Door inputs and outputs go to diagnostics page (Triangle) VSK and then select the "TrakMT Diagnostics" key.
-
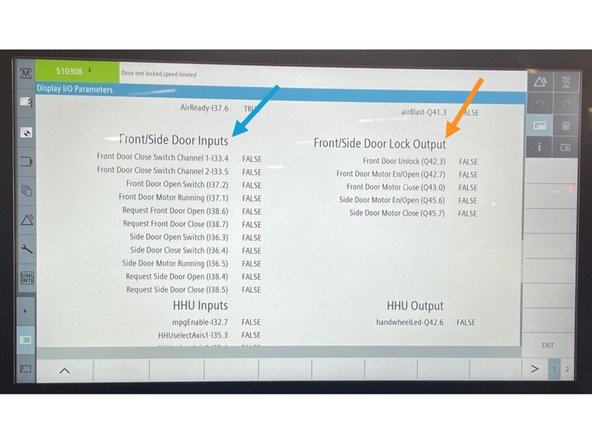
Scroll down to "Front/Side Door Inputs" or "TC820LTY Inputs", from here you can press the open/close button on the control panel to move the Auto Door to the open and closed positions and verify that the inputs to the Siemens change from false to true and back when opening and closing the door.
-
Next you can use the door unlock and open/close buttons on the main control panel and watch the outputs to see if they change from false to true and back when locking/unlocking, and opening/closing the door. Once the inputs and outputs have been verified, exit diagnostics and return to the main screen.
-
-
-
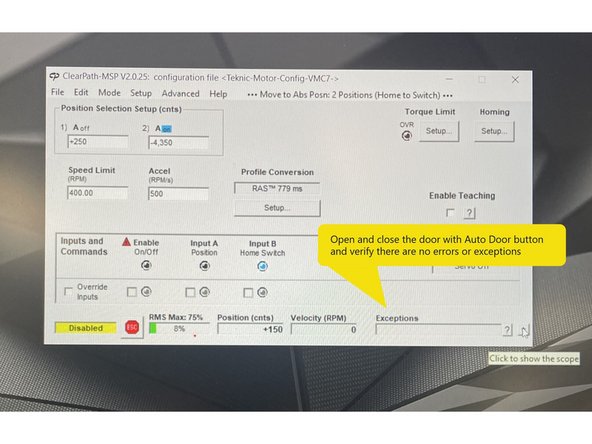
Once you have entered the position Counts, verified the door locks and checked the door inputs and outputs, open and close the door a few times using the Auto Door button on the Siemens control panel and verify there are no exceptions or errors.
-
If there are exceptions or errors go back and check the mechanics by moving the door manually. You are looking for tight spots or binds, the movement should be smooth without an increase in force needed to open or close the door throughout the travel. If the mechanics check out contact TRAK Support.
-
-
-
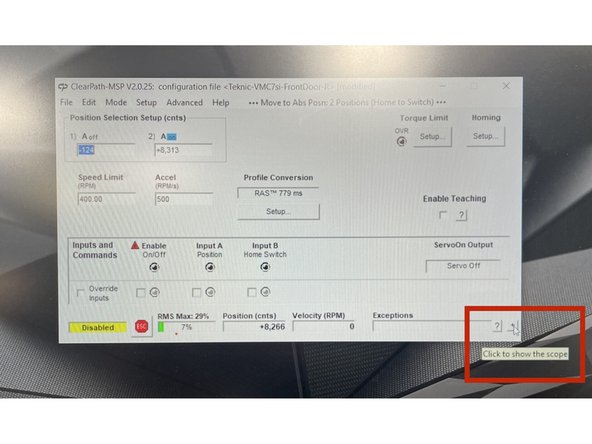
The final step in the setup of the Auto Door is measuring the the motors Load Error.
-
From the Clear Path main screen on the lower right hand corner there is a button with a "+" on it, press that to open the scope. See Photo 1
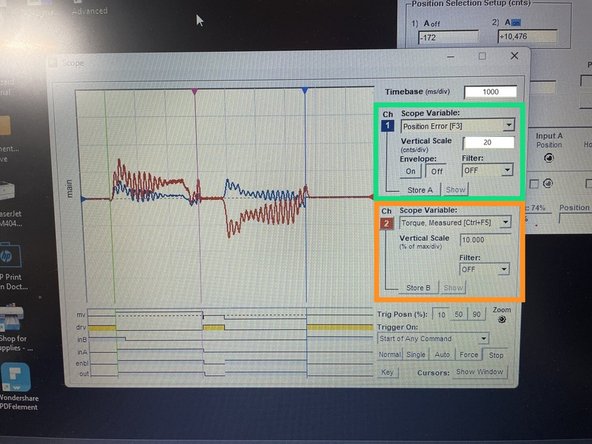
-
Once the scope opens, set the time base to 1000, verify that channel 1 Scope Variables are set to Position Error, Vertical Scale 20.00 and the Envelope and Filter are both off. See Photo 2
-
Channel 2 should be set to Torque Measured, and the Vertical Scale should be set to 10 per division and the filter set to off. See Photo 2
-
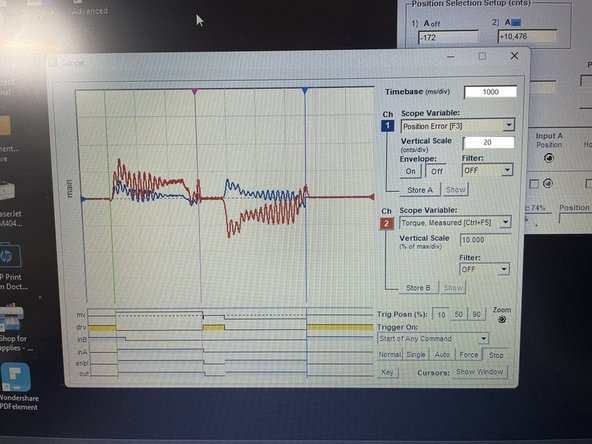
To measure the motor load torque start with the door all the way closed and press the Auto Door button on the Siemens control panel to open the door. Once the door is all the way open wait 1 second (one square of the graph) then press the button again to close the door. This should display the complete open/close wave forms. See Photo 3
-
The Position Error should be 20 or less. If the Error is above 20 go back and check the mechanics by moving the door manually. You are looking for tight spots or binds, the movement should be smooth without an increase in force needed to open or close the door throughout the travel. If the mechanics check out contact TRAK Support.
-
If the Load Error is in tolerance, take a screenshot of the scope graph and save it on the laptop to upload it with the config file afterwards, then exit the Clear Path software, disconnect the laptop from the motor and replace the dust cap on the motor. Auto Door programing is complete.
-