Introduction
The Trace function is used to Trace the status of variables on a TRAK VMCsi over a given time. The results of the Trace are displayed on the screen in a graphical format.
-
-
To access the Trace tool on the Siemens control, (1) press the Diagnostics shortcut key on the left-hand side of the screen, then (2) press the Page Select Horizontal Soft Key (HSK) to go to Page 2, and then (3) press on HSK "Trace."
-
-
-
Press the Vertical Soft Key (VSK) "New trace (Drive/NC...)" in order to create a new Trace session.
-
The "New session" window appears. (1) Input the file name for the new Trace session; the file name will be saved as an .xml file.
-
(2) Choose either "PLC/NC/servo variables" or "Drive variables" for the new Trace, and then (3) press VSK "OK" in order to create the new Trace session.
-
The default Trace is for the Tracing of NC/PLC/Servo variables. For the Tracing of Drive variables, it is necessary to create a new Trace session.
-
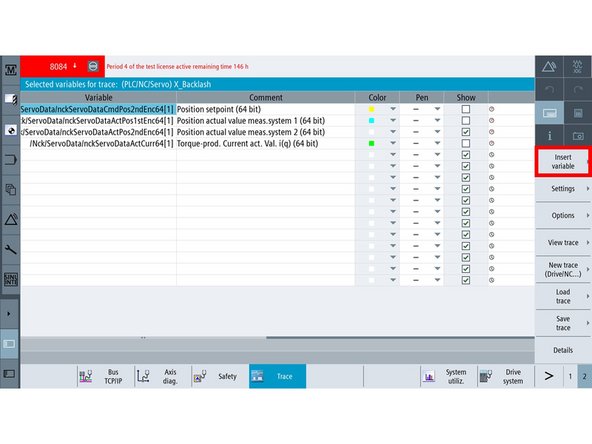
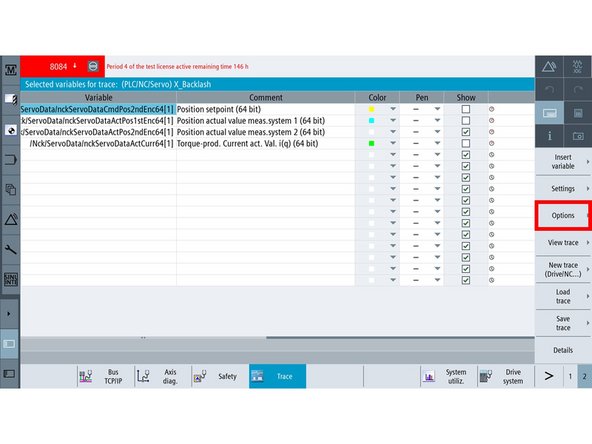
The "Selected variables for trace" window appears. This window will have columns that describe: (1) the variable(s) to be Traced, (2) descriptions of each variables, each variable's (3) Trace color and (4) style of line when it appears on the graph, and (5) the capability to show or hide a specific Trace when it is shown on the graph.
-
-
-
Press VSK "Insert Variable" to add variables that can be included as part of the Trace.
-
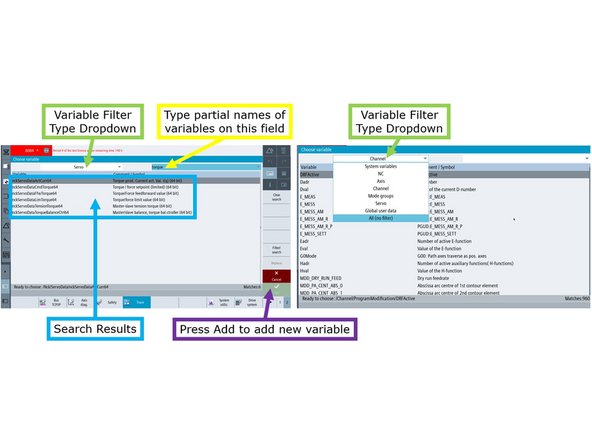
The "Choose Variable" window appears.
-
From this window, you can search for specific variables by typing partial names on the search field.
-
You can also apply different types of filters as part of the search. Filter types include System variables, NC, Axis, Channel, Mode groups, Servo, Global user data, or All (no filter).
-
The search results will feature the variable name, as well as a description of that particular variable.
-
Once a variable had been properly identified, press VSK "Add" to add it to the list of variables that will be part of the Trace.
-
If you have chosen any Axis or Servo variables to be added to the Trace, the "Variable attributes" window will appear. (1) Input the appropriate axis, and then (2) press VSK "OK."
-
The "Variable attributes" window will only appear when you select Axis or Servo variables from the variable filter. This window will not appear for any of the remaining variable filter types.
-
-
-
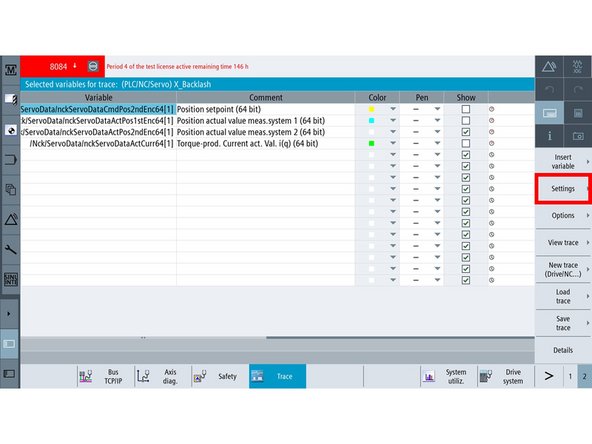
The VSK "Settings" can be used to set up the conditions for starting and stopping the Trace.
-
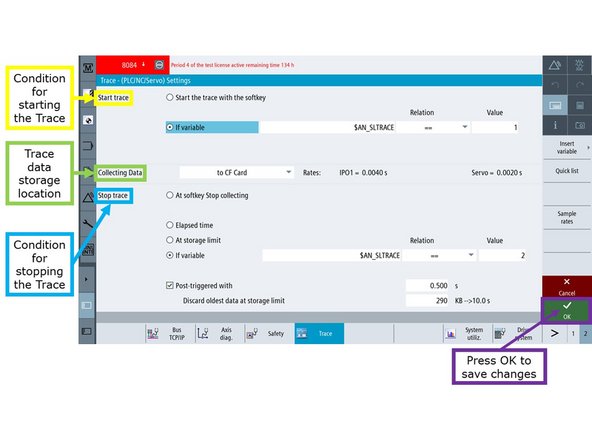
The "Trace - (PLC/NC/Servo) Settings" window will appear. It contains three (3) sections: (1) Start trace, (2) Collecting Data, and (3) Stop trace:
-
The "Start trace" setting enables the conditions for starting the Trace. The Trace can be set up to start by either pressing VSK "Start trace," or by having it started by the condition of a specific variable that is chosen by the user.
-
The "Collecting Data" setting establishes the location of where the Trace data will be stored. Trace data could either be stored on the CF card or NCK (NC memory). Please note that collecting data to the NCK offers the least Trace time/storage space.
-
The "Stop trace" setting enables the conditions for stopping the Trace. The Trace could either be stopped by using VSK "Stop trace," after a specified amount of time (milliseconds, second, minutes, hours, days), when it reaches a specified size/storage limit, or by a condition of a specific variable that is chosen by the user (If variable setting).
-
The "If variable setting" has two (2) additional options: (1) the "Post-triggered with" setting enables an additional setting to delay the stopping of the Trace after the "Stop trace" condition has been met.
-
In addition, (2) the "Discard oldest data at storage limit" sets the limit at which point the oldest data is deleted during long Traces.
-
Once the appropriate changes had been made on the "Trace Settings" window, press VSK "OK" to save these new changes.
-
-
-
Pressing VSK "Options" allows certain options of the Trace feature to be changed.
-
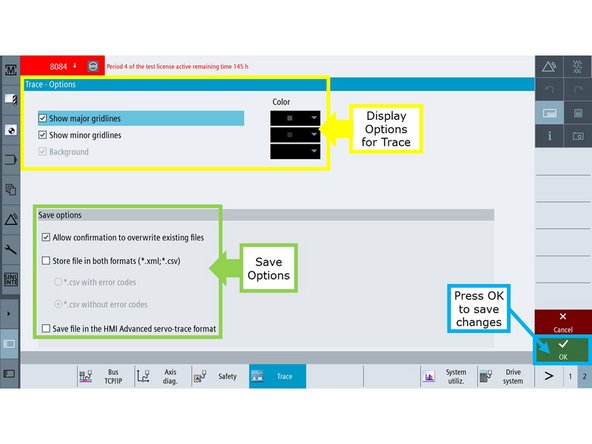
The "Trace - Options" window appears, and it features both Trace and Save Options, which is discussed below:
-
The Trace Options on this window allows you to show/hide both major and minor gridlines, as well as define colors for each of the gridlines. You can also customize the background color of the Trace.
-
The Save Options include the following capabilities: (1) show/hide a confirmation prompt each time a Trace session is to be overwritten, (2) allows Trace files to be saved in both .xml and .csv formats with or without error codes, and (3) store additional export data in the HMI Advanced servo-trace format.
-
Once the appropriate changes had been made on the "Trace - Options" window, press VSK "OK" to save these new changes.
-
-
-
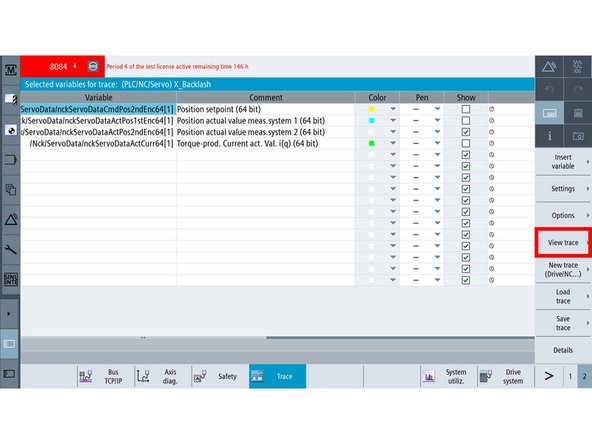
Pressing VSK "View trace" takes you to the Trace screen.
-
The "Trace" window appears.
-
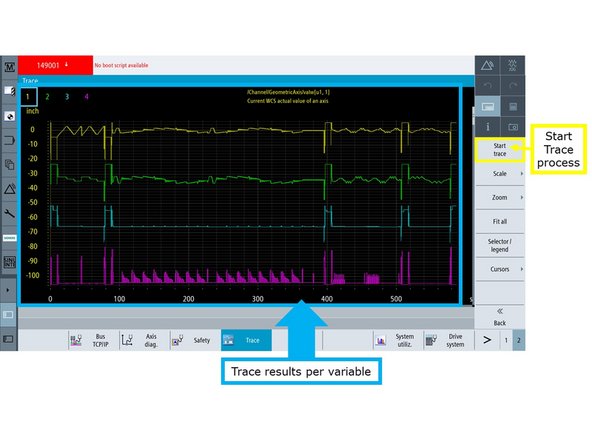
Pressing VSK "Start trace" will begin the Trace recording process for the selected variables.
-
However, please note that if the If variable setting had been turned on, VSK "Start trace" will only initialize the Trace process, but it will not begin recording. The conditions indicated by the user under the "If variable" setting must first be met before the Trace tool actually starts recording.
-
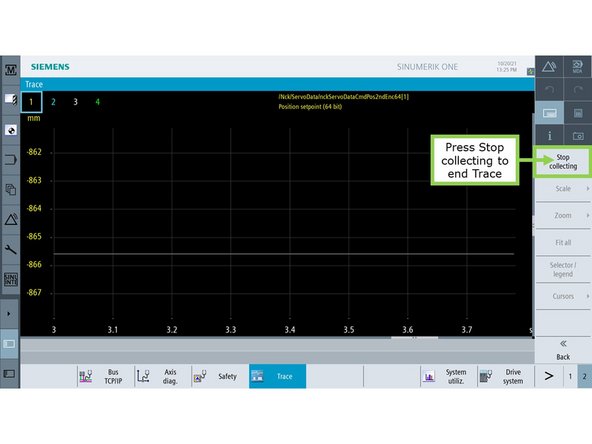
Once the Trace tool has collected sufficient data, press VSK "Stop collecting."
-
However, please note that if either the Elapsed time, At storage limit, or If variable settings had been turned on instead, the conditions indicated by the user under either of these settings must first be met before the Trace tool actually stops recording.
-
The Trace results will then be generated on the screen, as shown on the image.
-
-
-
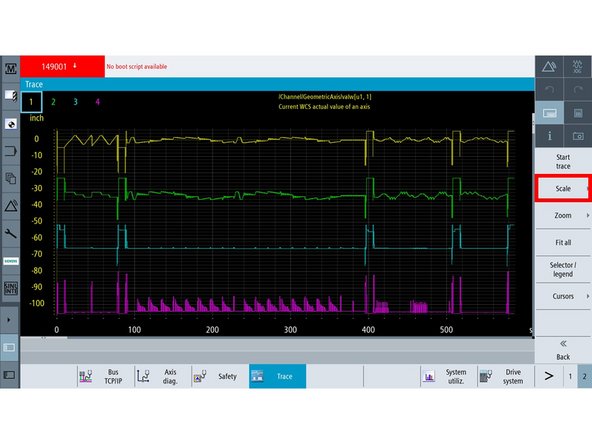
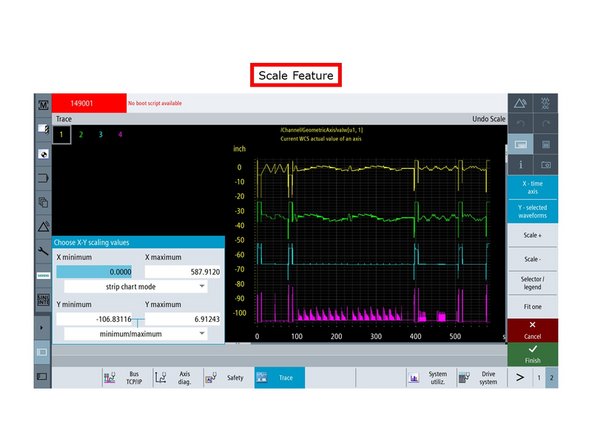
Back to the "Trace" window, press VSK "Scale" to enable the Scale feature, which can be used to accurately highlight a section of a Trace.
-
The Scale feature allows you to set the minimum and maximum scaling values over the X and Y Axes, incrementally increase/decrease scale values of an entire Trace, and/or show/hide specific variables of a Trace in order to adjust their respective scale values.
-
-
-
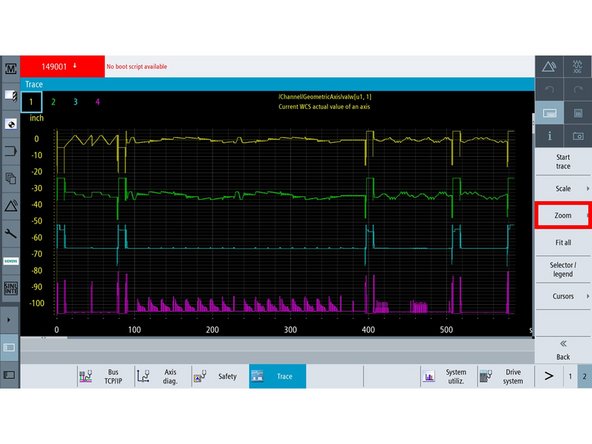
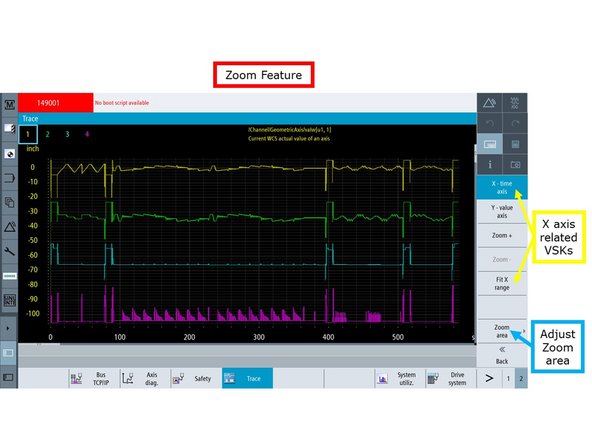
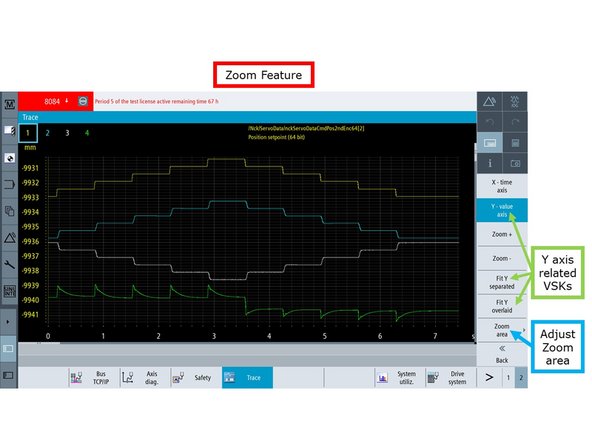
The "Trace" window also includes the Zoom feature, which can be accessed by pressing VSK "Zoom."
-
The Zoom feature allows you to zoom in or out of specific values over both X and Y axes of a Trace. Once you press Zoom button, you will see a different menu of Vertical Soft Keys:
-
X - time axis: When you press this VSK, you can zoom in and out along the X axis by pressing Zoom+ and Zoom- respectively.
-
Fix X range VSK will bring back the original screen capture.
-
Y - value axis: When you press this VSK, you can zoom in and out along the Y axis by pressing Zoom+ and Zoom- respectively.
-
Fit Y separated VSK will show all the variables captured as a separate non overlapping waveform.
-
Fit Y overlaid VSK will show all the variables captured on top of one another.
-
Zoom area: Pressing this VSK enables the Zoom+ and Zoom- VSKs to appear, which allow you to zoom into or out of the specific area when they are pressed.
-
-
-
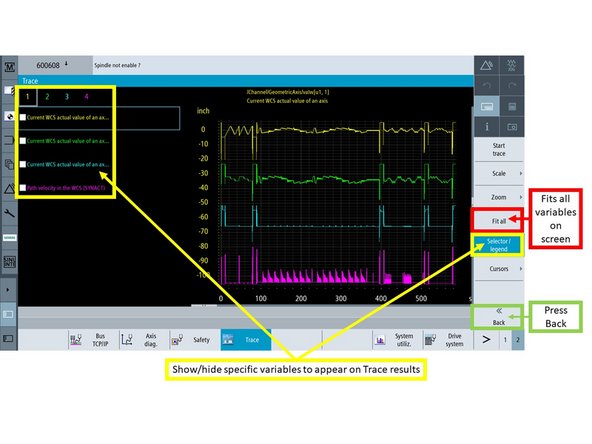
Back to the "Trace" window, press VSK "Fit all" in order to fit all variables to appear on the Trace results screen.
-
In addition, press VSK "Selector/legend" in order to show and/or hide specific variables from appearing on the Trace results screen. Each variable is color coded based on user preference, and can be shown or hidden by checking or unchecking each variable on the left-hand side of the screen.
-
Press VSK "Back" in order to return to the "Selected variables for trace" window.
-
-
-
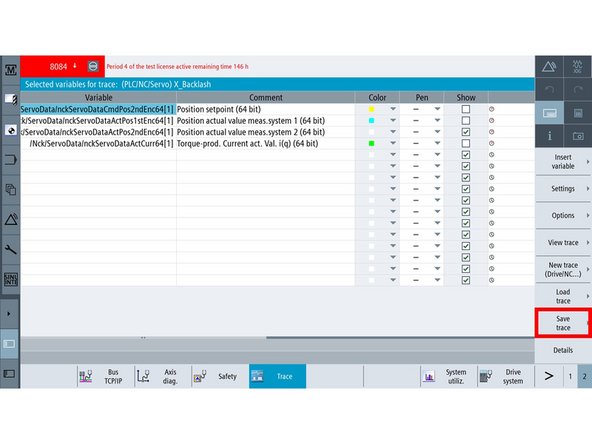
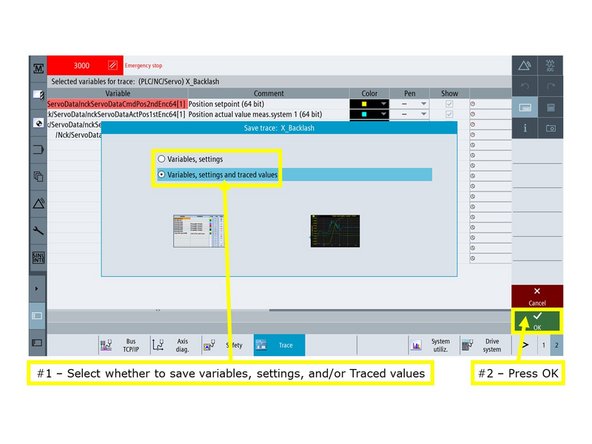
Back on the "Selected variables for trace" window, press VSK "Save trace" in order to save Trace information locally on the control or externally to USB memory devices.
-
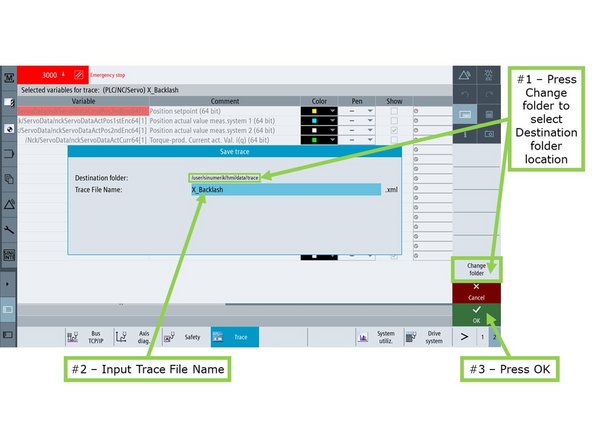
The Trace file will be saved to the following default location on the control: /user/sinumerik/hmi/data/trace.
-
The "Save trace: Session" window appears. (1) Choose either to save variables and settings, and/or to save Traced values as well. Then, (2) press VSK "OK" to continue.
-
On the next screen, you can either save the Trace file at the default location on the control, or choose another Destination folder location:
-
(1) Press VSK "Change folder" in order to save the file under a different Destination folder, which can also be an external USB device.
-
(2) Input the Trace file name, and then (3) press VSK "OK."
-
-
-
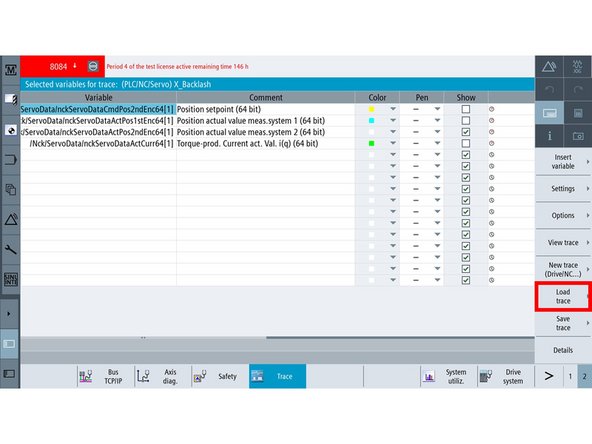
Back on the "Selected variables for trace" window, press VSK "Load trace" in order to load files that contain Trace information from local locations on the Siemens control, or from external locations such as USB memory devices.
-
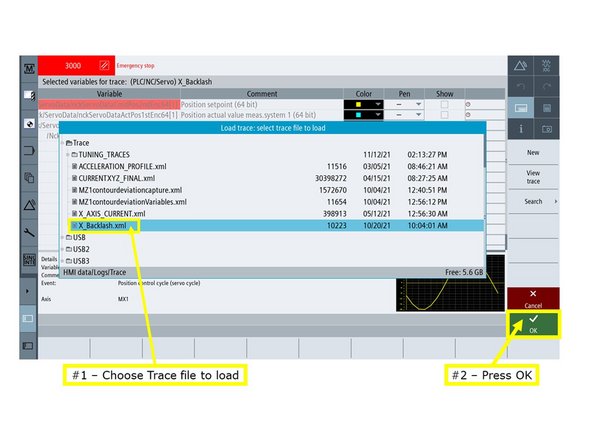
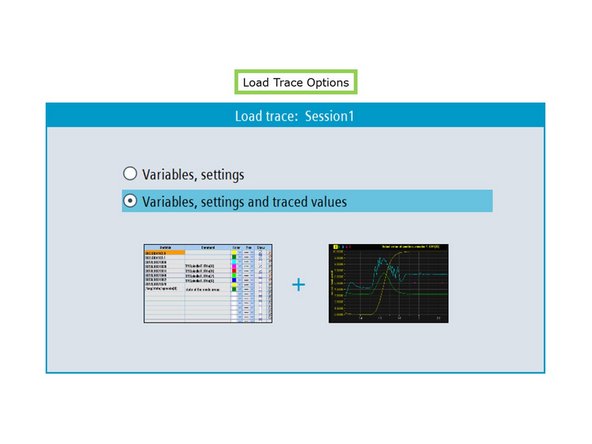
The "Load trace: select trace file to load" window appears. (1) Choose the appropriate Trace file, and then (2) press VSK "OK" to load it.
-
You can choose to load Trace with Variables and settings only, or with Variables, settings and traced values.
-
If you are using the "Load trace" feature to load only the Trace names and settings, and you are planning to capture new values of the Trace variables, then use the Variables and settings only option.
-
The option with Variables, settings and traced values will load the values of the Traces when the Trace was saved the last time.
-
-
-
On the "Selected variables for trace" window, (1) press VSK "Details" to view detailed information on a selected variable.
-
As shown on the image, (2) the Variable name, Comment, Event, Axis, and a graphic sample of the variable's Trace are provided by the "Details" softkey.
-