-
-
Start with a clean USB drive.
-
There should be no files on the USB stick other than the deployment '.usz' file. The machine upgrade may fail if the deployment file is not copied to a blank USB.
-
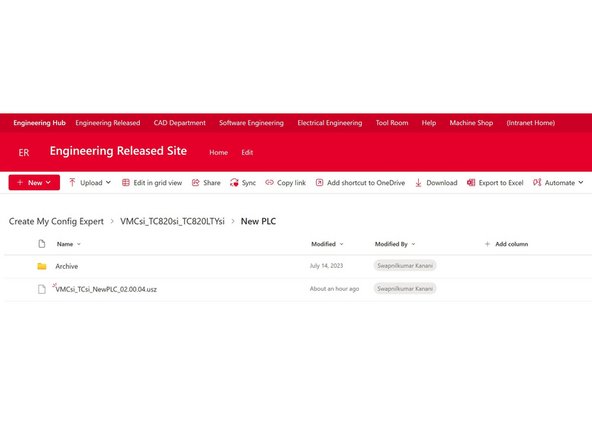
Locate the master deployment file stored on SharePoint:
-
-
Engineering will release a new deployment file (.usz) to fix bugs and add new features, so the version on the hyperlink may differ from the one shown in the picture.
-
Copy the ".usz" file to your USB drive.
-
-
-
-
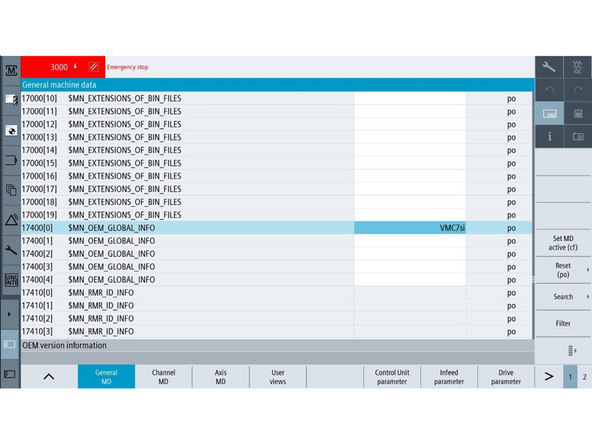
To set Machine Identification: go to [Setup] → [Machine Data] → [General MD] → [Search].
-
Enter 17400 and press [Input], then confirm the parameter matches the machine type.
-
VMC7si
-
VMC10si
-
VMC12si
-
VMC14si
-
After updating 17400[0], press [Reset (po)] to apply changes.
-
-
-
Automation Ready uses parameters 14512[26], 14512[27], and 14512[28]. These parameters may contain default values from the factory archive, so they must be verified before and after the upgrade. Expert Deployment does not change these settings.
-
Go to [Setup] → [Machine Data] → [General MD] → [Search] → 14512 → [Input].
-
Check if any automation options are active or if the machine uses automation.
-
If automation is enabled and working as expected, record the current values of 14512[26], 14512[27], and 14512[28].
-
If automation is disabled and 14512[26], 14512[27], or 14512[28] are non-zero, set them to 0H.
-
These will be verified again after Expert Deployment.
-
Press [Reset (po)] if you changed any values.
-
-
-
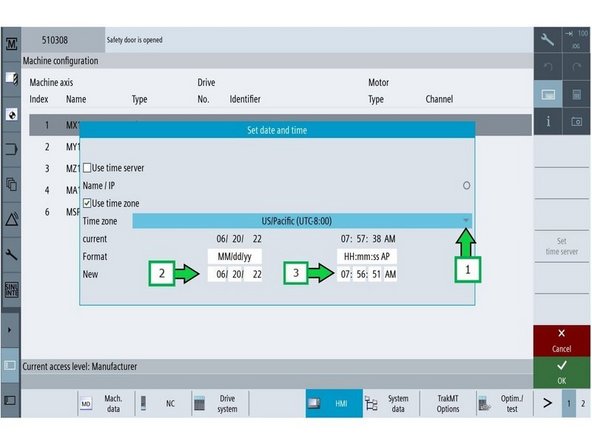
To set Date and Time: Go to [Setup] → [HMI] → [Date time].
-
Verify date and time.
-
If necessary, adjust the time: Update to the correct time, then click [Accept] and [OK].
-
-
-
Close the machine door.
-
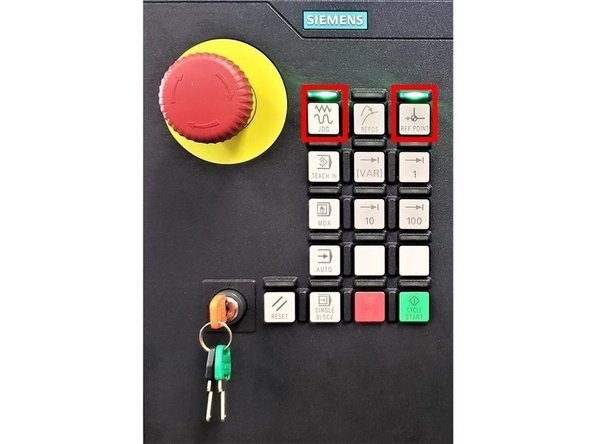
Turn on both the [JOG] and [REF. POINT] buttons on the MCP.
-
Press and hold [MAG], then press the [+] button to reference the tool magazine.
-
Check position: Go to [Tool List], verify that the green open arrow and pot number match the tool change position in the magazine.
-
Press [JOG] on the control panel to disable REF mode.
-
Adjust if Necessary: If the pot position and tool table green arrow do not match, perform a tool change.
-
-
-
Go to [Machine] and verify that the measurement is in inch at the position banner.
-
If you need to change the measurement to inch: Go to [Settings] → [Page 2], then press [Changeover inch].
-
Confirm the machine is now set to [inch].
-
-
-
Press [E-Stop].
-
Go to [Setup] → [2nd Page] → [Setup Archive] → [All data of this machine] → [Ok]
-
(1) Make sure all boxes are checked.
-
(2) Select the [Archive name] data field. Name the file: Backup_NPDHS-YYYY-MM-DD_BEFORE_UPGRADE. Press [OK].
-
Note: YYYY-MM-DD is the current date (e.g., June 26, 2023, is written as 2023-06-26 in the archive name).
-
The default storage path should be [Archives/Manufacturer]. If the storage path is anything other than the default, change it by pressing [Change storage path] → [Archive/Manufacturer] → [OK].
-
This screen will also give you the option to save the archive to either USB port.
-
-
-
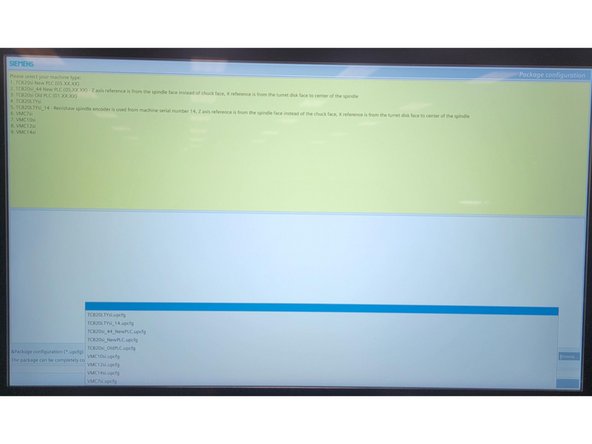
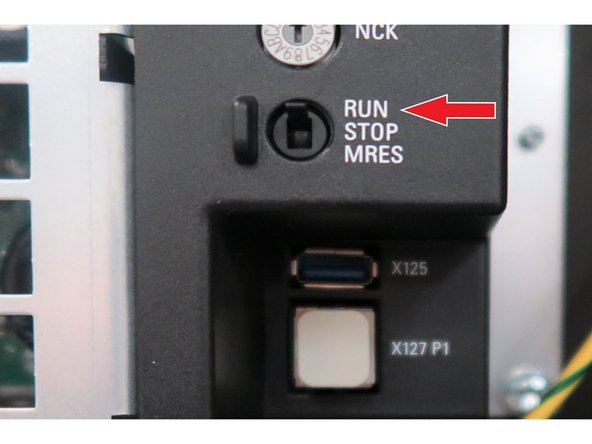
Power off machine. Remove pendant rear cover. Insert USB at the rear of the pendant below the switch. Move the switch from [RUN] to [Stop]. Power up machine. Click the down arrow and select one based on machine model:
-
VMC7si
-
VMC10si
-
VMC12si
-
VMC14si
-
It is extremely important to select the correct option. If the wrong option is chosen, you’ll need to load the original archive saved in Step 7 and repeat the upgrade process.
-
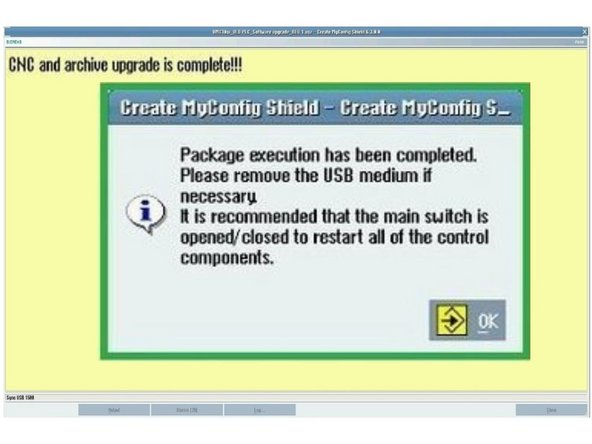
After selecting the correct option, press [Next]. The upgrade will take approximately 20-25 minutes if only the deployment file is applied. However, if the CNC software upgrade is also included, the process will take around 45-50 minutes. When the upgrade is complete, press [OK].
-
If the popup window showing "Package Execution has been Completed" did not appear, or if you see a "Package Canceled" message in red at the top of the screen, then the expert deployment was not executed successfully. Please contact customer support for assistance.
-
-
-
From the rear of the pendant, remove the USB.
-
Set the switch to [Run] while the machine is still powered. The machine interior lights will light up after this is done.
-
If the switch is not set to [Run], the machine will not start in the run state, and an additional power cycle will be required.
-
Power cycle machine.
-
If you receive Error 2000: PLC Sign-of-Life Monitoring, switch the mode to Stop while the machine is still running, then back to Run, and power cycle the machine.
-
Set Manufacturers Password
-
Go to [Tool List] and verify the ATC is at position 1.
-
Verify date and time. Go to [Setup] → [HMI] → [Date time]. Adjust if necessary.
-
-
-
After Expert Deployment, you must confirm that parameters 14512[26], [27], and [28] match the values recorded before the upgrade. Expert Deployment does not change these parameters, but the machine archive may retain factory default values from Ping Jeng.
-
Go to [Setup] → [Machine Data] → [General MD] → [Search] → 14512 → [Input].
-
Check the current values for 14512[26], 14512[27], 14512[28].
-
Compare these values to the ones you recorded before the upgrade. If the values do not match:
-
If automation is enabled, restore the original recorded values.
-
If automation is disabled, set all three parameters to 0H.
-
Press [Reset (po)] if you changed any values.
-
-
-
Go to [Setup] > [2nd Page] > [Setup Archive] > [All data of this machine].
-
(1) Make sure all five components are selected with a check box.
-
(2) Select the [Archive name] data field. Name the file: Backup_NPDHS-YYYY-MM-DD_AFTER_UPGRADE. Press [OK].
-
-
-
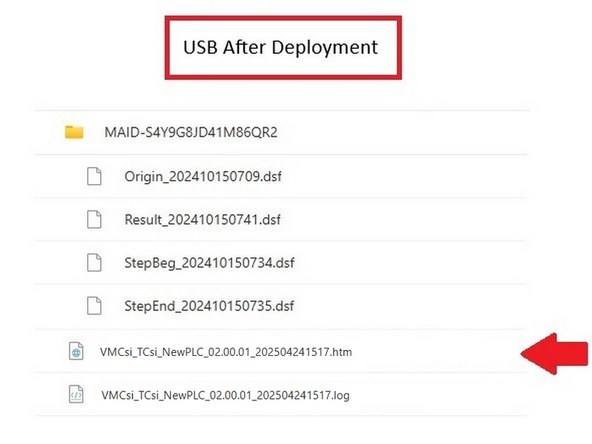
After deployment, the contents of the USB are displayed here, with the HTML file highlighted.
-
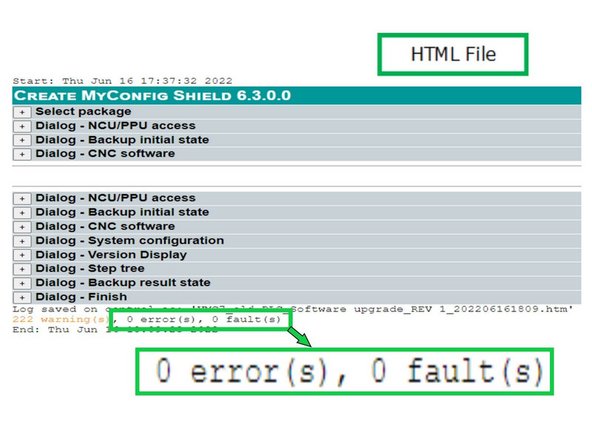
Open the HTML file listed on the USB either on the Siemens control or by opening it in a browser on a computer.
-
It is important to look towards the bottom of the file checking for the [errors] and [faults] fields. They should be [0] otherwise report to engineering.
-
-
-
When the machine leaves the factory, the directory will be created in the machine config folder; FST's loading files only need to locate it by serial number.
-
-
Create a new directory within the correct machine folder named ExpertDeployment_Date
-
Replace Date with the deployment date (e.g., ExpertDeployment_31NOV24).
-
Copy the five items to new folder: (1) Complete MAID directory with four files, (2) HTML file, (3 ) Text document, (4) Archived file saved at the end of Step 7. (5) Archived file saved at the end of Step 11.
-
Please load all five Items to the directory.
-
If you have trouble finding the correct location for the files, please contact customer support for assistance.
-
![Automation Ready uses parameters 14512[26], 14512[27], and 14512[28]. These parameters may contain default values from the factory archive, so they must be verified before and after the upgrade. Expert Deployment does not change these settings.](https://d3t0tbmlie281e.cloudfront.net/igi/trakmtsupport/eUWHjiRMNVCJRfOr.medium)
![To set Date and Time: Go to [Setup] → [HMI] → [Date time].](https://d3t0tbmlie281e.cloudfront.net/igi/trakmtsupport/W2TXQiKg3LMLTIcP.medium)
![Turn on both the [JOG] and [REF. POINT] buttons on the MCP.](https://d3t0tbmlie281e.cloudfront.net/igi/trakmtsupport/Fbf6WYUlcbcKQGqS.medium)
![Press and hold [MAG], then press the [+] button to reference the tool magazine.](https://d3t0tbmlie281e.cloudfront.net/igi/trakmtsupport/VaJy4oClmdaBj3Bf.medium)
![Go to [Machine] and verify that the measurement is in inch at the position banner.](https://d3t0tbmlie281e.cloudfront.net/igi/trakmtsupport/lHktuPgYtgOLW34N.medium)
![If you need to change the measurement to inch: Go to [Settings] → [Page 2], then press [Changeover inch].](https://d3t0tbmlie281e.cloudfront.net/igi/trakmtsupport/EenOXjImarhRBnee.medium)
![Press [E-Stop].](https://d3t0tbmlie281e.cloudfront.net/igi/trakmtsupport/udZvtvLwBv2FcjYL.medium)
![Go to [Setup] → [2nd Page] → [Setup Archive] → [All data of this machine] → [Ok]](https://d3t0tbmlie281e.cloudfront.net/igi/trakmtsupport/OGFTcyOYmqEmFISW.medium)
![Power off machine. Remove pendant rear cover. Insert USB at the rear of the pendant below the switch. Move the switch from [RUN] to [Stop]. Power up machine. Click the down arrow and select one based on machine model:](https://d3t0tbmlie281e.cloudfront.net/igi/trakmtsupport/Q3rRKkDcbmQ2xJrq.medium)

![Set the switch to [Run] while the machine is still powered. The machine interior lights will light up after this is done.](https://d3t0tbmlie281e.cloudfront.net/igi/trakmtsupport/2XDy1JRLMWChA1wj.medium)
![After Expert Deployment, you must confirm that parameters 14512[26], [27], and [28] match the values recorded before the upgrade. Expert Deployment does not change these parameters, but the machine archive may retain factory default values from Ping Jeng.](https://d3t0tbmlie281e.cloudfront.net/igi/trakmtsupport/YBBMjjRMovCJRfOr.medium)
![Go to [Setup] > [2nd Page] > [Setup Archive] > [All data of this machine].](https://d3t0tbmlie281e.cloudfront.net/igi/trakmtsupport/HbRCkVKI1FKytOuO.medium)