-
-
There are five archive components. You can back up or restore any combination of these:
-
NCK (Numeric Control Kernel) Controls CNC system, servo loops, program execution, and G-code pathing. Includes: Machine data, settings, options, user data, tools, magazine data, protection zones, R parameters, offsets, workpieces, programs, cycles, macros, collision avoidance, and compile cycles.
-
PLC (Programmable Logic Controller) Manages machine logic and safety systems. Includes: PLC user program.
-
Drives Controls motors and executes movement. Includes: Sinamics servo data.
-
HMI (Human Machine Interface) Manages the touchscreen and user interface. Includes: Cycle storage, text, templates, apps, configs, logs, user views, and dictionaries.
-
System Settings Stores general configurations. Includes: Drive configs, TCU settings, IP/network settings, and screen layout (mmc.ini).
-
-
-
Press [E-Stop]
-
Go to [Setup] (wrench icon on the left).
-
Select [Set Password] and enter TRAKmt2021 as the manufacturer password.
-
Press [OK].
-
Navigate to [Setup] → [2nd Page] → [Setup Archive]
-
Only Service or Manufacturer level users can create or restore archives.
-
-
-
Under Generate archive, select [All data of this machine(backup)]
-
Press [Ok]
-
By default, all components will be highlighted for backup.
-
Press [OK] to confirm, or [Cancel] to exit.
-
You can choose specific components or archive all by default.
-
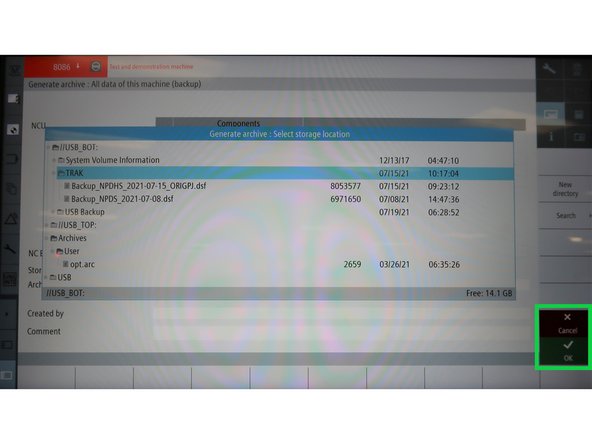
The system’s default storage path is [Archives/Manufacturer].
-
To change the storage location, use the pop-up window to navigate directories or select an external USB (plugged into the right edge of the pendant).
-
Once ready, press [OK] to finalize and save the archive to the selected directory.
-
-
-
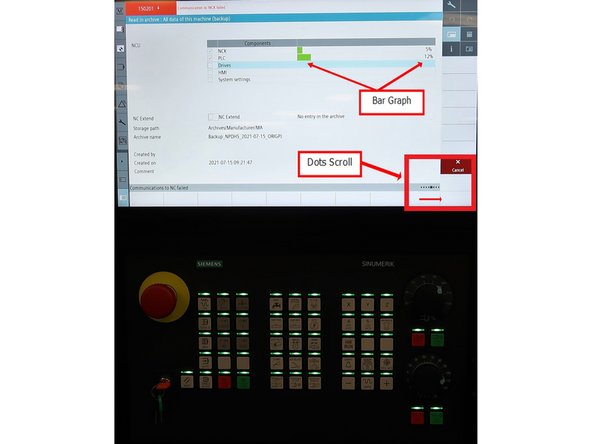
The archive operation will begin, shown by a line of dots scrolling across the lower right corner of the touchscreen.
-
This process may take several minutes.
-
A bar graph will appear to show the archive progress.
-
All green lights on the lower keyboard will flash simultaneously during the operation.
-
Once the archive is complete, the system will display a confirmation message.
-
-
-
Once the archive is created, you can save a backup copy to USB.
-
After the machine reboots, you'll be logged out of Manufacturer Mode.
-
Go to [Setup] (wrench icon on the left).
-
Select [Set Password] and enter TRAKmt2021 as the manufacturer password.
-
Navigate to [Setup] → [System data]
-
Then in the file structure go to: Archives → Manufacture
-
Select the archive and press [Copy]
-
Choose a storage device (USB Top or USB Bottom), then press [Paste] to save it.
-
![Press [E-Stop]](https://d3t0tbmlie281e.cloudfront.net/igi/trakmtsupport/EoEGdwKtYhyLRjb2.medium)
![Go to [Setup] (wrench icon on the left).](https://d3t0tbmlie281e.cloudfront.net/igi/trakmtsupport/G3PLaKTKrSdZijof.medium)
![Under Generate archive, select [All data of this machine(backup)]](https://d3t0tbmlie281e.cloudfront.net/igi/trakmtsupport/Bar4EAEJjITTH4UG.medium)
![Press [Ok]](https://d3t0tbmlie281e.cloudfront.net/igi/trakmtsupport/sbDXw5bT3dXgpZpu.medium)