
Introduction
This guide details how to download, install, and register for the Smart Slicer Interface (SSI) Slicing Software for the 3ntr 3D Printers.
In addition, we have also also attached the SSI User Manual at the end of this guide for your reference.
-
-
The following section applies for downloading, installing, and registering for the Smart Slicer Interface (SSI) software for 3ntr's A2v4 and A4v4 3D Printers.
-
Make sure to meet all of the following requirements before proceeding with the next steps:
-
Minimum Operating System Requirements: Windows XP/7/8/10.
-
Have ethernet connection (Internet and Print Server). You must have a working internet connection, so that you can receive the prompt to update SSI as soon as it is installed.
-
Have access to the SSI Product/License Key and the SSI Installer File (which is included in a flash driver). Both of these items are included in the packing list that is supplied to clients with any 3ntr printer.
-
Have administrator access on your computer to install new software; you may need administrator password before proceeding.
-
If you need assistance accessing the Product/License Key and/or the SSI Installer File, please reach out to the following email address: additivemanufacturing@trakmt.com.
-
-
-
The 3ntr 3D Printer MUST be unplugged from your computer during the installation process.
-
Double click on the SSI Installer File. Be sure that no other program is running on your computer.
-
The installation process will begin, and the "Select Setup Language" window will appear. Choose your preferred language for installation, and click "OK."
-
The "License Agreement" window will appear next. Carefully review all license terms on this window, and click on "I accept the agreement." If you do not agree with the terms, the installation process will not continue any further.
-
Next, the "Select Components" window will appear. Select the components you want to install; clear the components you do not want to install. Click "Next >" when complete.
-
Please note that default installation components are recommended.
-
Next, you will be prompted for where you would like to install the software, as shown in the image. After choosing the location where you would like to install, click on the "Next >" button to continue.
-
-
-
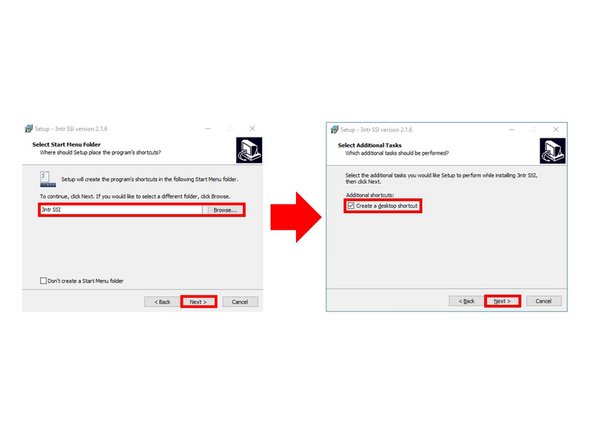
Next, the "Select Start Menu Folder" window will appear. If you choose to do so, follow the prompt to create SSI shortcuts in a specific Start Menu folder location. Click "Next >" to continue to the next step.
-
The "Select Additional Tasks" window will appear next. Check if you choose to create a desktop shortcut for SSI; otherwise, click "Next >" to continue to the next step.
-
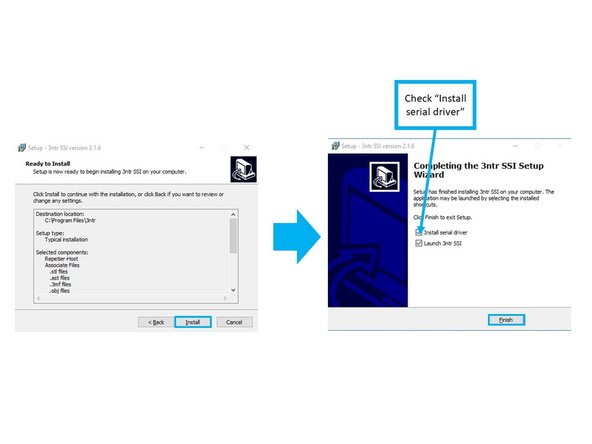
The "Ready to Install" window will now appear. Click "Install" to begin the installation process; the SSI software will begin copying over.
-
Once this process is complete, you will be notified that the setup was completed successfully. On the "Completing the 3ntr SSI Setup Wizard," make sure to check both "Install serial driver" and "Launch 3ntr SSI." Click "Finish" when completed.
-
The "FTDI CDM Drivers" window will appear. As prompted, click "Extract" to unpack the most current version of FTDI's Windows driver package and to launch the installer.
-
Next, the "Device Driver Installation Wizard" window will launch. Click "Next >" to begin installing the Windows driver package.
-
-
-
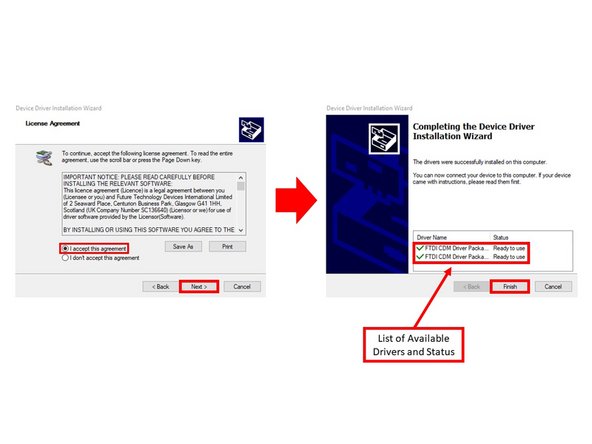
The "License Agreement" section of the Device Driver Installation Wizard will appear next. Carefully read all terms on this window, and click on "I accept the agreement." If you do not agree with the terms, the installation process will not continue any further.
-
The drivers will begin installing on your computer. Once the installation process has completed, the "Completing the Device Driver Installation Wizard" window will appear. This window will also provide a listing of available drivers and their installation status. Click "Finish."
-
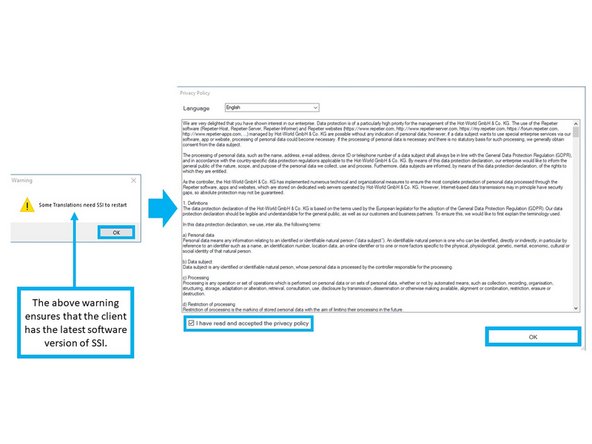
Next, a warning will appear, which mentions that some translations need SSI to restart. This process simply ensures that you have the latest version of SSI. Click "OK" to continue.
-
The "Privacy Policy" window will appear next. Carefully review the policy, and check on "I have read and accepted the privacy policy." If you do not check on this agreement, the installation process will end. Once you have accepted the Privacy Policy, click "OK."
-
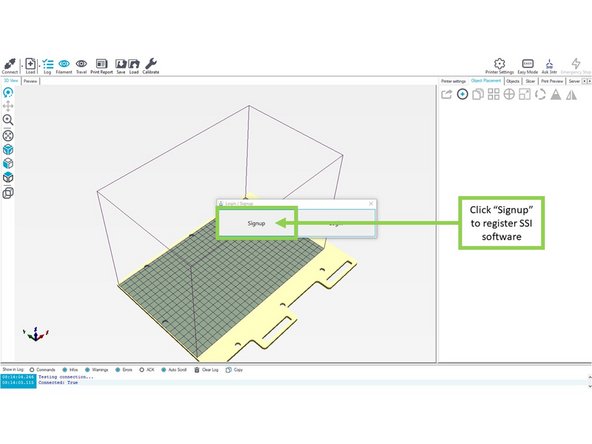
The SSI program will now start running. Once the program starts, you will be prompted either to Login or Signup. If you are a first time user, you must click "Signup" in order to register and create login information.
-
-
-
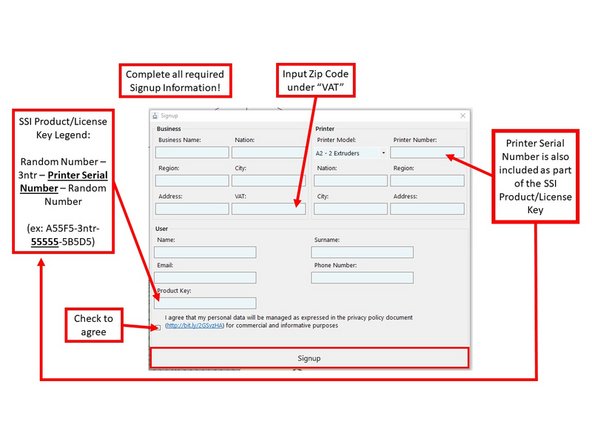
Once the "Signup" window appears, complete all required fields for the "Business," "Printer," and "User" sections.
-
For USA users, input your Zip Code under the "VAT" field.
-
Make sure to input the Product/License Key correctly under the User section; it will serve as your primary login credentials when you login to the SSI program.
-
Please refer to the image for a breakdown of what is included in the Product/License Key; it will include the Printer Serial Number that is required under the "Printer" section of the "Signup" window.
-
Check to agree to comply with the Privacy Policy statement. If you choose not to agree, the installation will prevent you from registering the program.
-
Once all of the above steps have been completed, click on "Signup" to complete the registration process.
-
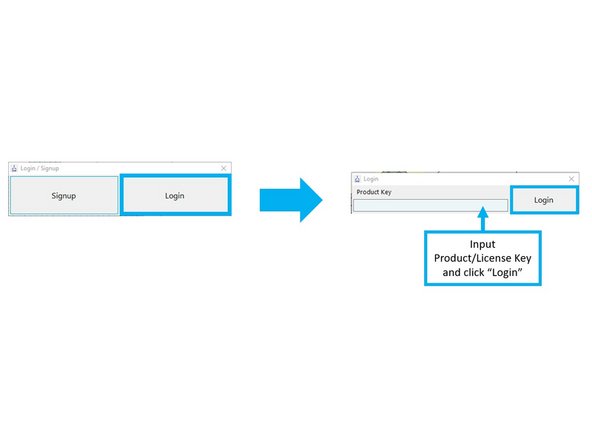
Once registration is complete, you will be directed back to the "Login / Signup" window. Click "Login."
-
On the actual "Login" window, input the Product/License Key under the "Product Key" field, and click "Login." You should now be able to use the SSI product.
-
-
-
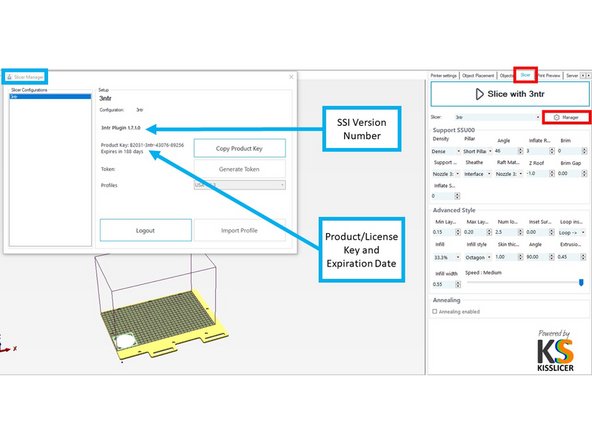
Access the "Slicer Manager" window within SSI to keep track of the SSI Version Number, and the Product/License Key and its expiration date.
-
To access the "Slicer Manager" window, go to the "Slicer" tab of the Tabs screen area.
-
In the "Slicer" tab, click on the "Manager" button.
-
The "Slicer Manager" window will appear. From this window, you can access the SSI Version Number, the Product/License Key, and the Product/License Key expiration date.
-


Cancel: I did not complete this guide.
One other person completed this guide.