
Introduction
This guide details how to download, install, and register for the APEX Slicing Software for the Airwolf 3D Printers.
Please visit the following link for more information regarding the APEX software for Airwolf 3D: https://airwolf3d.com/3d-printing-softwa...
-
-
The following section applies to downloading and installing the APEX software for Airwolf 3D's EVO 3D printers.
-
Please visit the following link for detailed instructions on how to download and install the most current APEX 3D-Printing Software for Airwolf 3D:
-
-
The above link also has an instructional video that will guide users through the installation process.
-
Ensure that your system meets all Minimum System Requirements for either Windows or MAC OS X before proceeding with the next steps (please refer to the image on the left).
-
Depending on the operating system that you are currently using, click on either the "Download APEX for Windows" or the "Download APEX for MAC" buttons to download the installation file.
-
Double click on either the APEX .exe file (Windows) or the .gz file (MAC OS X) in order to begin the installation process.
-
If you have a previous version of APEX installed, make sure to update the software to ensure you have the latest changes and improvements.
-
-
-
Once the installation process begins, the "License Agreement" window will appear. Carefully review all license terms on this window, and click on the "I Agree" button. If you do not agree with the terms, the installation process will not continue any further.
-
Next, you will be prompted for where you would like to install the software, as shown in the image. After choosing the location where you would like to install, click on the "Next >" button to continue.
-
The "Choose Components" window will appear. Check all applicable components of the APEX software that need to be installed, and click "Install."
-
The APEX software will begin copying over. Once this process is complete, you will be notified that the setup was completed successfully. Click on "Next >" to continue onto the next screen.
-
The "Completing the Apex Setup Wizard" window will appear. Check on the "Start Apex" checkbox, and hit "Finish." The APEX software will automatically start.
-
-
-
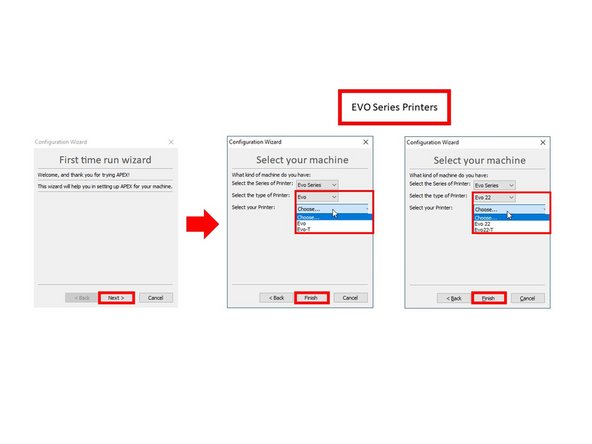
The "Configuration Wizard" will appear. Under the "First time run wizard" section, click "Next >."
-
On the next screen, select the appropriate machine:
-
Select "Evo Series" under Series of Printer.
-
Select either "Evo" or "Evo 22" under type of Printer.
-
Under the "Evo" printer type, choose "Evo-T."
-
Alternatively, choose "Evo22-T" under the "Evo 22" printer type.
-
Click "Finish" to complete installation.
-
Follow the APEX intro video: Download APEX 3D-Printing Software Page
-


Cancel: I did not complete this guide.
One other person completed this guide.